


OM-223 839 Page 14
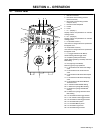
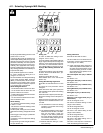
4-6. Setup Menu
Press P2 to enter SET UP menu.
Setup allows viewing and changing default
parameter values for all welding processes
for the desired weld characteristics.
D1 shows the welding parameter.
D2 shows the parameter value.
E1 changes the welding parameter.
E2 changes the parameter value.
P2 allows to exit setup Menu and Ad-
vanced Programming and to save the
changed parameters.
. Incorrect settings in any process can
result in a program with undesirable
weld characteristics. Setup should
only be used by operators familiar with
various welding processes and pa-
rameters.
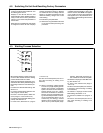
Setting Menu Type
To set menu type, proceed as follows:
Press P2 to enter Setup menu.
Use E1 to select SET (setup) SHO (short)
on D1 and D2 (default setting).
Use E2 to change D2 to FULL.
. MENU SHORT only shows basic pa-
rameters for welding processes. SET-
UP FULL shows all parameters for
welding processes. Menu selection is
set when exiting the Setup Menu.
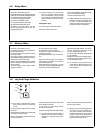
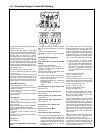
4-7. Memory Menu
Press P2 to enter Memory menu.
D1 shows the first free memory position or
the last memory used.
E1 changes the memory position number
from P.01 to P.99.
Any memory position contains all the se-
lected MIG welding parameters in the Wire
Feeder and in the Power Source.
When a memorized welding point is loaded
the Wire Feeder and the Power Source is
set accordingly.
Verify the Power Source status before
welding, if needed.
D1 shows the memory position.
E1 changes the memory position.
D2 shows the action you can perform on
the memory position.
E2 changes the action on the memory posi-
tion.
When D2 shows Ld (load), you can load in
the welder the parameters in the memory
position selected by D1.
When D2 shows Sto (storage), you can
memorize the actual welding parameters in
the memory position selected by D1.
When D2 shows dEL (delete), you can de-
lete the parameters memorized in the
memory position selected by D1.
In order to confirm the action, press P2 until
D1 and D2 flash.
Release P2 and wait until flashing stops.
The action is now performed and the weld-
er exits the Memory menu.
. Do not perform any operation on the
welder when in Memory menu to pre-
vent incorrect weld parameters and
poor operation.
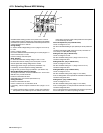
4-8. Jog And Purge Selection
. If a function is selected and not used
within several seconds, the LED will
turn off .
To use the jog and purge function, proceed
as follows:
Pressing P3 once selects jog. Pressing P8
a second time selects purge.
When L15 illuminates, press and hold P3 to
perform jog function.
Jog feeds welding wire without weld output
power applied to the wire.
In Jog mode, D1 shows JOG and D2
shows wire feed speed.
Use E2 to change wire feed speed setting.
. Jog will be performed if gun trigger is
pressed and held without striking a
welding arc. Front panel Jog is recom-
mended.
When L16 illuminates, press and hold P3 to
perform purge function.
. Purge is used to remove impurities and
fill the gas hose with shielding gas.
Pre−Gas is a similar function, but only
operates at the beginning of a welding
process. Purge can be performed in
the TIG process by pressing the torch
trigger without striking an arc.
L15
L16
P3