


OM-223 839 Page 18
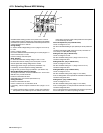
4-12. Selecting Synergic Pulsed MIG Welding
Set Synergic Pulsed MIG welding process on the
power source. L7 is On.
Synergic Pulsed MIG welding is a high quality
welding process that produces very little spatter.
This process works well on thin metals such as
stainless steel and aluminum. In Synergic
Pulsed MIG mode, the operator may need to ad-
just welding data (wire type, wire diameter, and
gas type) and only one weld parameter. General-
ly, wire feed speed is adjusted and the synergic
process automatically sets appropriate weld
voltage. Synergic welding also sets many sec-
ondary welding parameters automatically for im-
proved weld quality.
Trim parameter appears on D1 and D2:
D1 value is default trim setting of 0.0 T (range is
−5.0 T to 5.0 T).
D2 value is default wire feed speed setting of 5.0
m/min (minimum (MIN), maximum (MAX), or de-
fault (DEF) values are arbitrary based on set
welding data). Use P2 and E2 to change this dis-
play to amperes or to the thickness of the weld.
While Setting Parameters:
- L2 ON means that D1 shows Trim value.
- L3 ON means that D2 shows the wire speed in
meter/min or inch/min.
- L4 ON means that D2 shows the set welding
current in amperes.
- L5 ON means that D2 shows the thickness of
material to weld.
While Welding:
- D1 shows the measured welding voltage in
Volts. L1 is ON.
- D2 shows the measured welding current in am-
peres. L4 is ON.
Set wire speed, welding current or material thick-
ness and welding voltage with E2 and E1.
Select trigger mode using P1 pushbutton (see
Section 4-4).
If necessary, use P2 to adjust the welding pa-
rameters.
Purge air from gun hose using P3 pushbutton
(see Section 4-8).
Setting Trim
See Section 4-11.
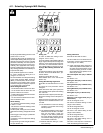
Synergic Pulsed MIG Welding Advanced Set-
tings
To change all values list, unit must be SETUP
FULL. To set unit to SETUP FULL, proceed as
follows:
Press P2 to enter SET UP menu.
Select SETUP FULL on D1 and D2 (see Section
4-6).
Setting Main Welding Regulation
See Section 4-11.
Setting Inductance in Synergic Pulsed MIG
Welding
Press P2 to enter SET UP menu.
Use E1 to select on D1 ind. D2 shows 100.
If necessary, use E2 to adjust inductance value
(range is 1% to 200%).
This parameter is related to Pulse Width. Higher
values give a hotter welding arc.
. Change these parameters as little as pos-
sible because the factory settings are pre-
ferred for most applications.
Big changes can affect the arc stability and
weld performance.
In general, remain in the 70% to 130%
range.
Wire Feed Speed Unit (only in SETUP FULL)
See Section 4-10.
Setting Pre-Gas (only in SETUP FULL)
See Section 4-10.
Setting Post-Gas (only in SETUP FULL)
See Section 4-10.
Setting Burnback (only in SETUP FULL)
See Section 4-10.
Setting Run-In (only in SETUP FULL)
See Section 4-10.
Setting 3 Level Trigger Mode
See Section 4-11.
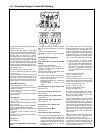
Setting Synergic Double Pulsed MIG
. Synergic Double Pulsed MIG process is se-
lected at the power source or recalled in the
wire feeder using Synergic Double Pulsed
programs. All Double Pulse parameters are
selected on the wire feeder. All other MIG
parameters are the same as standard
Pulsed MIG process.
Some metals weld better using the Synergic
Pulsed Welding process due to the unique puls-
ing of the welding arc. Heat generated in the
workpiece is generally lower and the arc charac-
teristics produce a better weld bead appearance
especially on aluminum. The Synergic Double
Pulsed MIG process allows control all parame-
ters to produce high quality welds on aluminum.
. Incorrect settings in Synergic Double
Pulsed Welding process can result in a pro-
gram with undesirable weld characteristics.
Setup should only be used by operators fa-
miliar with various welding processes and
parameters. In some cases, standard Syn-
ergic Pulsed MIG welding can produce bet-
ter welds.
Press P2 to enter SET UP menu.
Use E1 to change D1 to 2P.F.
Use E2 to change D2 value.
The range of this setting is 0.1 Hz to 5.0 Hz. This
setting allows changing double pulse frequency
in hertz (cycles per second). A recommended
frequency is approximately 1 hertz.
Use E1 to change D1 to 2P.C.
D2 value is default setting of 50%.
Use E2 to change D2 value.
The range of this setting is 25% to 75%. This set-
ting allows changing the time that the pulse is at
high output. A lower setting will produce less
heating at the welding puddle.
Use E1 to change D1 to 2P.O. D2 value is default
setting of 20%. Use E2to change D2 value. The
range of this setting is 20% to 80%. This setting
allows changing the difference in high wire feed
speed and low wire feed speed in percent of the
wire feed speed setting. For example, if the main
wire feed speed is set at 5 M and 2P.0 setting in
D2 is 40%, the wire feed speed will change be-
tween 4 m/min and 6 m/min. A recommended
setting is 20%.
Use E1 to change D1 to 2P.A. D2 value is the de-
fault setting of 0.0. Use E2 to change D2 value.
The range of this setting is −5.0 to 5.0.
This setting allows changing the low end of trim
in double pulse and the main setting for trim will
be the low end. A higher 2P.A setting will produce
a longer and hotter arc and lower setting will pro-
duce a shorter and cooler arc.
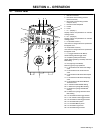
E1 D1 D2 E2
P1 P2 P3
L1
L2 L3 L4 L5
L7
L8