


6 7
WARNING!
Always lock trigger or remove
battery pack before changing or
removing accessories. Only use
accessories specifically recom-
mended for this tool. Others may
be hazardous.
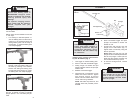
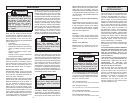
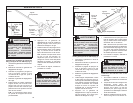
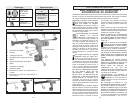
Installing 10oz Carriage Frame Assem-
bly (Cat. No. 6560-21) (Fig. 3)
1. Lock trigger or remove battery pack.
2. Press in and hold rod release trigger.
3. Grasp plunger rod handle and pull
plunger rod back until the rod tip is just
inside of tool.
4. Release rod release trigger.
5. Thread barrel nut attached to tube
holder onto nose of the tool. Tighten
with spanner wrench by placing
wrench into two smaller holes in bar-
rel nut and turning clockwise.
NOTE: The frame cap, barrel nut, and
carriage frame are provided pre-as-
sembled.
ASSEMBLY
WARNING!
To reduce the risk of injury,
keep hands out of the plunger
area of the tool. Fingers can be
pinched between the tube holder
and the plunger.
Fig. 3
Plunger
Plunger rod
Nut
Carriage frame
Barrel nut
Nut
Frame cap
6. Press rod release trigger and push
plunger rod forward to access the
threads on rod.
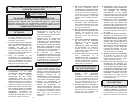
7. Thread nuts and plunger onto the
plunger rod in order shown (Fig. 3).
Tighten back nut securely using the
wrench provided.
NOTE: Make sure the front nut and
plunger rod do not extend past the front
face of the plunger. If either part ex-
tends past the plunger, the back cap
of the material tube may rupture.
8. To remove carriage frame, reverse
procedure.
Front face of plunger
Front nut
Back nut
Plunger rod
6560-21
WARNING!
Charge only MILWAUKEE 12, 14.4
and 18 Volt battery packs in
MILWAUKEE chargers. Other
brands of batteries may explode
causing personal injury and
damage.
For specific charging instruc-
tions, please read the operator's
manual supplied with your
charger.
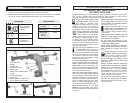
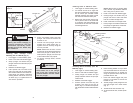
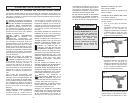
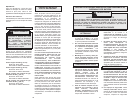
Inserting Battery Pack into Tool
For all models:
Battery pack can be inserted into the tool
in two ways.
1. For working in restricted spaces: In-
sert the battery pack from the front by
pressing in the release buttons and
sliding battery pack into the body of
the tool (Fig. 1). Insert the battery pack
until clamp engages.
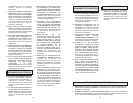
2. For optimum weight distribution and
balance: Insert the battery pack from
the back by pressing in the release
buttons and sliding the battery pack
into the body of the tool (Fig. 2). Insert
the battery pack until clamp engages.
Fig. 2
Fig. 1
NOTE: A 12 volt battery is supplied with
this tool. To extend run time or increase
plunger speed, a 14.4 volt battery may be
used.