


2
Max RPM: 500,000 RPM
Min. Trigger Duration: 10 µsec
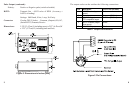
Indicators: LEDs for On Target, Laser On, Auto/Gain, Power/Charge
Modes: Normal (manual) or Auto, and charging
Normal mode – manual adjustment of sensitivity / gain
Auto mode – auto learn, automatic gain control
Sensitivity Adjust: Single Turn knob on top panel in Normal mode
Voltage Requirements:
Operational: Internal: rechargeable batteries
External: +9 V 1VA
Charging: External: +9 V 3VA
Batteries: Internal 4 “AA” rechargeable NiCd 700mAh
Run Time: Over 6 hours continuous operation from fully charged
batteries @ 70 °F (21 °C)
Charge Time: Typically less than 3 hours @ 70 °F (21 °C)
PR Universal Charger:
Input: 100-240 V , 50-60 Hz
Output: 9 V , Dry location use only
Check charger label for power information.
Pulse Output:
SO: Source Output - Square Wave 0 to 3.9V typical @ 15mA
(PNP to 4.2V, 4.7K ohms to common) (TTL Compatible)
OC: Open Collector - Switches to common, External pull up
resistor to user supplied power (max 24 V ) required
9
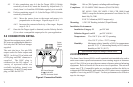
6.0 OPERATION
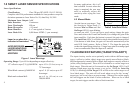
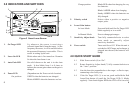
Note: Refer to Figure 3 for switch and button locations.
Turn the unit on by moving the Power switch (8) to the On position. The
unit may be operated from the internal batteries and/or the charger/power
supply. The internal batteries will be trickle charged when using the AC
charger/power supply. To turn the unit off, slide the Power switch (8) to
the Off/Charge position. If the charger is plugged in, the batteries will
charge.
The sensor emits a laser beam, which is reflected back by a target (reflective
tape/paint, keyway, contrasting colors, etc). This reflected light is sensed
and amplified then compared to a threshold level (sensitivity) - the lower
the threshold level, the more ‘sensitive’ the sensor is. Whenever the amplified
signal is above the threshold, the output goes high (positive pulse) or low
(negative pulse). The user can select either a positive or a negative output
pulse using the Polarity switch (5).
The gain of the input amplifier and the sensitivity can be adjusted manually
or automatically. This allows the unit to be used with many types of
targets at various distances and contrasting color conditions. To select the
Auto mode, turn the Sensitivity Adjust knob (7) fully counterclockwise,
otherwise you are in the Manual mode. Reflective tape and high contrast
color applications should be able to use the Auto mode.
6.1 Auto Mode
Make sure the Sensitivity Adjust knob (7) is fully counterclockwise
and the Auto/Gain LED (3) is on. Aim the laser at your target. Press
and hold the Learn/Gain button (6) until the On Target LED (1) blinks
regularly or is on solid (depending on the RPM of the target). Release
the Learn/Gain button. The Auto/Gain LED will blink to show what
gain has been selected. Refer to Table 2.