


5
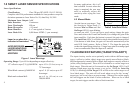
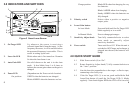
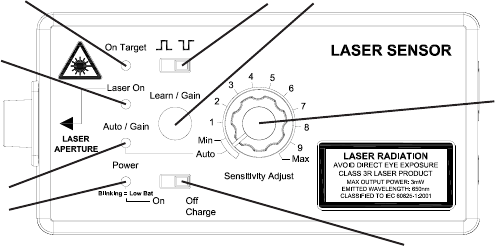
3.0 INDICATORS AND SWITCHES
1. On Target LED Lit whenever the sensor is receiving a
reflected signal back from the target. As the
frequency increases, it will be on solid unless
the measured frequency is not stable. This is
useful in setting up the unit.
2. Laser On LED Blinks when unit is first turned on. Remains
lit when the laser beam is on.
3. Auto/Gain LED On solid whenever the unit is in the Auto
mode. It also blinks from 1 to 8 times to
indicate the current gain whenever the gain is
changed.
4. Power LED (Dependent on the Power switch location)
On position: GREEN when the batteries are charged.
Blinks AMBER when the batteries are low.
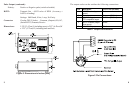
Figure 3 Smart Laser Sensor
1
2
3
4
56
7
8
6
Charge position: Blinks RED when fast charging for very
low batteries.
Blinks AMBER when slow charging.
Steady AMBER when the batteries are
fully charged.
5. Polarity switch Selects either a positive or negative
output pulse.
6. Learn/Gain button
In Auto Mode: Press and hold until the On Target LED
blinks regularly or is on solid.
In Manual Mode: Press to change gain ranges.
7. Sensitivity Adjust knob Turn fully counterclockwise to select
Auto mode or manually adjust
sensitivity threshold.
8. Power switch Turns unit On or Off. When the unit is
switched to Off/Charge and a charger is
plugged into the unit, the batteries will
charge.
4.0 QUICK START GUIDE
4.1 Slide Power switch (8) to “On”.
4.2 Rotate Sensitivity Adjust knob (7) fully counterclockwise to
the “Auto” position.
4.3 Aim the laser dot perpendicular to the target - reflective tape,
contrasting color or keyway.
4.4 If the On Target LED (1) is not on, push and hold the Red
Learn/Gain button (6) until the On Target LED (1) blinks
regularly. Note that at higher RPMs the LED will be on solid.