


-
9
-
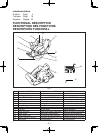
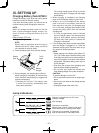
III. SETTING UP
Charging Battery Pack EY9251
Charge the battery pack when the cutting speed
becomes too slow for effective cutting.
If you have two battery packs, you can use one to
continue working while charging the other one.
NOTE:
When you charge the battery pack for the first
time, or after prolonged storage, charge it for
about 24 hours to bring the battery up to full
capacity.
Battery charger (EY0110)
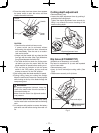
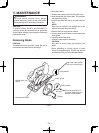
1. Plug the charger into the AC outlet.
NOTE:
Sparks may be produced when the plug is
inserted into the AC power supply, but this is
not a problem in terms of safety.
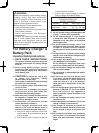
2. Insert the battery pack firmly into the charger.
Battery
pack
To AC
outlet
Battery
charger
1
2
3. During charging, the charging lamp will be lit.
When charging is completed, an internal elec-
tronic switch will automatically be triggered to
prevent overcharging.
• Charging will not start if the battery pack
is warm (for example, immediately after
heavy-duty operation).
The orange standby lamp will be lit until the
battery cools down. Charging will then begin
automatically.
4. When charging is completed, the charging
lamp will start flashing quickly in green color.
5. When in any of the conditions that battery
pack is too cool, or the battery pack has not
been used for a long time, the charging lamp
is lit. In this case, charging takes longer to fully
charge the battery pack, than the standard
charging time.
• If a fully charged battery pack is inserted
into the charger again, the charging lamp
lights up. After several minutes, the charg-
ing lamp may flash quickly to indicate the
charging is completed.
6. If the charging lamp does not light immediately
after the charger is plugged in, or if after the
standard charging time the lamp does not go
off, consult an authorized dealer.
NOTE:
• When charging a cool battery pack (below 5°C
(41°F)) in a warm place, leave the battery pack
at the place and wait for more than one hour to
warm up the battery to the level of the ambient
temperature. Otherwise battery pack may not
be fully charged.
• Cool down the charger when charging more
than two battery packs consecutively.
• Do not insert your fingers into contact hole,
when holding charger or any other occasions.
CAUTION:
To prevent damage or risk of fire:
• Do not use power source from an engine gen-
erator.
• Do not cover vent holes on the charger and the
battery pack.
• Unplug the charger when not in use.
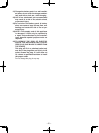
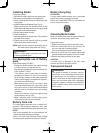
Lamp Indications
Red Flashing
Red Lit
Green Flashing quickly
Orange Lit
Orange Flashing
Charger is plugged into the AC outlet.
Ready to charge.
Now charging
Charging is completed.
Battery pack is warm. Charging will begin
when temperature of battery pack drops.
Charging is not possible. Clogged with
dust or malfunction of the battery pack.