


17
ASSEMBLY
Fig. 11
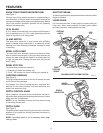
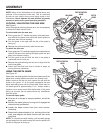
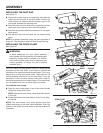
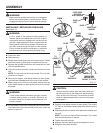
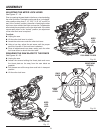
INSTALLING THE DUST BAG
See Figure 11.
Squeeze the metal clips on the dust bag, then slide the
metal ring over the end of the dust guide. Position the
metal ring so it is between the two molded rings on the
dust guide. Release the dust bag clips.
Snap the frame onto the slide bar by squeezing the dust
bag frame, then pushing it down over the slide bar.
Insert the dust guide inside the exhaust port in the upper
blade guard.
Slip the dust bag over the frame with the zipper facing
down.
NOTE: For efficient operation, empty the dust bag before it
is half full. This will permit better air flow through the bag.
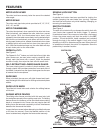
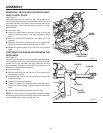
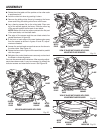
INSTALLING THE WORK CLAMP
See Figure 12.
WARNING:
In some operations, the work clamp assembly
may interfere with the operation of the blade guard
assembly. Always make sure there is no interfer-
ence with the blade guard prior to beginning any
cutting operation to reduce the risk of serious
personal injury.
The work clamp provides greater control by clamping the
workpiece to the miter table. It also helps to prevent the
workpiece from creeping toward the saw blade. This is very
helpful when cutting compound miters. Depending on the
cutting operation and the size of the workpiece, it may be
necessary to use a C-clamp instead of the work clamp to
secure the workpiece prior to making the cut. The work clamp
can be installed and used on either side of the blade.
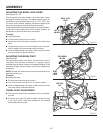
To install the work clamp:
Place the work clamp shaft in one of the holes located
behind the sliding miter fence.
NOTE: Align the pin on the work clamp shaft with the slot
in the hole.
Rotate the knob on the work clamp to move it up or down
as needed.
NOTE: The work clamp has a quick release lever that
makes positioning of the work clamp effortless. Push the
button on the side of the work clamp to quickly release the
workpiece.
DUST BAG FRAME
DUST BAG FRAME
DUST BAG
Fig. 12
EXHAUST
PORT
DUST
GUIDE
WORK CLAMP
QUICK
RELEASE
LEVER
WORK CLAMP
SHAFT