


16
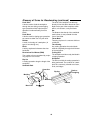
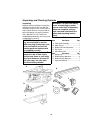
Getting to Know Your Table Saw
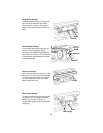
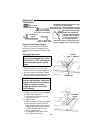
1. Rip Fence...is locked in place by
pushing the lock lever down until the
lever rests on the stop. To move the
fence, lift the lock lever and grasp
the fence with one hand at the front.
“T” slots are provided in the rip fence
for attaching a wood facing when
using the dado head, or molding
head.
2. Micro-Adjust Rip Fence...allows
the operator to accurately adjust the
rip fence using only one hand. To
move the fence push in on the
micro-adjust knob and rotate.
3. Table Extension Lock
Lever...Locks the sliding table exten-
sion.
4. Sliding Table Extension
...provides
additional working surface to support
large workpieces and increase rip
capability.
5. Rip Fence Storage...holds the
fence when not being used.
6. Miter Gauge Storage...holds the
miter gauge when not being used.
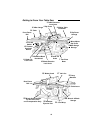
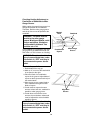
7. Two-Piece Base...supports table.
For additional stability, holes are pro-
vided in base to bolt the saw to a
workbench or stand or sawhorses.
8. Blade Bevel Scale...shows the
degree the blade is beveled.
9. Elevation/Bevel Handwheel
a. Elevates or lowers the blade.
Turn the knob clockwise to ele-
vate, counterclockwise to lower.
b. Use the knob to quickly tilt the
blade from 0° to 45°. Rotate the
outer hub for finer adjustments.
When the blade is tilted to the left
as far as it will go, it should be at
45° to the table and the bevel
pointer should point to 45°.
NOTE: There are limit stops
inside the saw which prevent the
blade from tilting beyond 45° to
the left and 0°. (See “Adjust-
ments and Alignments” section
“Blade Bevel, or Squareness of
Blade to Table”).
10. Blade Elevation Lock Knob...locks
the blade at the desired height.
11. Blade Bevel Lock Lever...locks the
blade in the desired bevel position.
Lift the lever to the right to unlock
push to the left to lock.
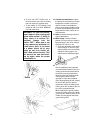
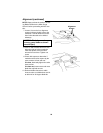
12. On-Off Switch
CAUTION: Before turning switch
“ON”, make sure the blade
guard is correctly installed and
operating properly.
The On-Off Switch has a locking fea-
ture. This feature is intended to help
prevent unauthorized and possible
hazardous use by children and oth-
ers.
a. To turn saw ON, insert key, stand to
either side of the blade, never in line
with it, place finger under switch
lever and pull end of lever out.
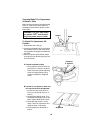
After turning switch ON, always allow
the blade to come up to full speed
before cutting. Do not cycle the
motor switch on and off rapidly, as
this may cause the sawblade to
loosen. In the event this should ever
occur, allow the sawblade to come to
a complete stop and retighten the
arbor nut normally, not excessively.
Never leave the saw while the power
is ON.