


Page 20
MAINTENANCE
WARNING:
To ensure safety and reliability, all repairs should be
performed by an authorized service center.
GENERAL MAINTENANCE
Avoid using solvents when cleaning parts. Most plastics are
susceptible to damage from various types of commercial
solvents and may be damaged by their use. Use clean cloths
to remove dirt, carbon dust, etc.
WARNING:
Do not, at any time, let brake fluids, gasoline, petroleum-
based products, penetrating oils, etc., come in contact
with plastic parts. They contain chemicals that can
damage, weaken or destroy plastic.
Keep your band saw clean.
Remove sawdust from the inside frequently.
Do not allow pitch to accumulate on the saw table, blade
guides, or thrust bearings. Clean them with gum and
pitch remover.
Apply a thin coat of automobile type wax to the saw
table’s top so the wood slides easily while cutting.
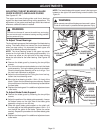
WARNING:
To prevent accidental starting that could cause possible
serious personal injury, turn off the saw, remove the switch
key, and unplug the saw before working on the band saw.
MOTOR/ELECTRICAL
Frequently vacuum or blow out sawdust from the motor.
WARNING:
If the power cord is worn, cut or damaged in any way,
have it replaced immediately by a qualified service
technician. Failure to do so could result in serious
personal injury.
WARNING:
To avoid fire or electrocution, reassemble electric parts
with only identical replacement parts. Reassemble exactly
as originally assembled.
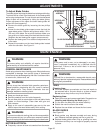
TIRES
Cleaning tires:
Pitch and sawdust accumulates on tires and needs to
be removed with a fine wire brush or a piece of wood.
Do not use a sharp knife or any kind of solvent.
Replacing tires:
Open front cover and remove saw blade. See section on
Installing and Adjusting the Blade, page 17.
Pry the worn tire away from the wheel carefully.
Stretch the new tire around the wheel.
Replace the saw blade and close the front cover.
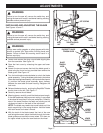
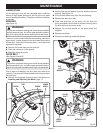
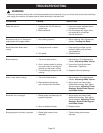
BLADE GUIDES
See Figure 22.
Blade guides may become rounded and worn during
use. Remove the blade guides and file or grind flat.
Replace blade guides when filing or grinding has worn
them down and they can no longer be properly secured
in place.
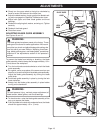
ADJUSTMENTS
To Adjust Blade Guides:
The blade guides help keep the blade from twisting and binding.
The blade will be ruined if the blade teeth hit the blade guides
while using the band saw. The set of teeth and the sharpened
edge of teeth will be damaged by hitting the blade guides.
Proper adjustment of the upper and lower blade guides will
prevent this from happening.
Remove the blade guard by loosening the two phillips
screws.
Loosen the two blade guide support screws that lock the
upper blade guides. Slide the two guides to within 1/32 in.
(0.8 mm) of the blade. Do not pinch the blade. Make sure
one guide is not further away from the blade than the other.
Retighten the two blade guide support screws securely.
Replace the blade guard if no additional adjustments are
to be made.
Repeat this procedure on the lower blade guides located
under the saw table.
See Figure 21.
Fig. 22
BLADE GUARD REMOVED
FOR CLARIFICATION ONLY
BLADE GUIDE
SUPPORT SCREW
BLADE GUIDES
THRUST
BEARING
SCREW
THRUST
BEARING
BLADE GUIDE
ASSEMBLY
UPPER BLADE
GUIDE
SUPPORT