


Page 17
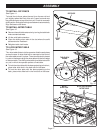
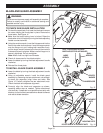
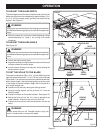
TO INSTALL RIP FENCE
See Figure 11.
To install the rip fence, place the rear lip on the rear rail and
pull slightly toward the front of the unit. Lower front end onto
the guide surfaces on top of the front rail. Check for a smooth
gliding action. Swing the locking handle down to automatically
align and secure the fence.
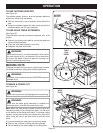
TO INSTALL MITER TABLE
See Figure 12.
Remove the solid table extension by turning the table lock
knob counterclockwise.
Lift the solid table extension.
Place the sliding miter table in the slot where the solid
table extension had been.
Retighten table lock knobs.
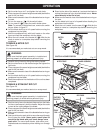
TO LOCK MITER TABLE
See Figure 13.
The miter table slides to let the operator slide the workpiece
across the saw. A miter slide lock is mounted on the front of
the miter table to lock it in place. The miter slide lock is placed
in a slot on the base to align the miter table with the front edge
of the saw table. The sliding miter table should be locked for
any cut in which the operator prefers a fixed table.
To lock the miter table with the base projecting to the front,
place miter slide lock in the back slot on the base.
To lock the miter table with the base projecting to the
back, place miter slide lock in the front slot on the base.
ASSEMBLY
RIP FENCE
FRONT
RAIL
Fig. 11
Fig. 12
Fig. 13
SLOTS FOR LOCKING
MITER TABLE
MITER
SLIDE LOCK
TABLE LOCK
KNOBS