


Page 20
MAINTENANCE
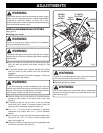
WARNING:
When servicing use only identical Ryobi replacement
parts. Use of any other parts may create a hazard or
cause product damage.
WARNING:
Unplug your router from its power supply before making
any adjustments or performing any maintenance
procedure.
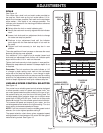
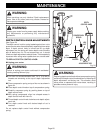
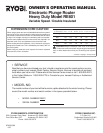
DEPTH CONTROL KNOB ADJUSTMENTS
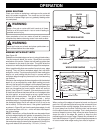
See Figure 24.
The depth control knob is spring loaded against hex nut to
prevent router motor from accidentally separating from router
base. If depth control knob is turned too far up depth
adjustment rod, the spring will cause depth control knob to
pop off before hex nut. Do not remove hex nut. It should
remain on depth adjustment rod at all times. This is especially
important when using router upside down on a router table.
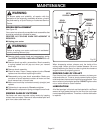
TO REPLACE DEPTH CONTROL KNOB:
■ Unplug your router.
WARNING:
Failure to unplug your router could result in accidental
starting causing serious injury.
■ Turn hex nut counterclockwise until 1/4 in. (6.4 mm) of
threads are remaining at the top of depth adjustment
rod.
■ Place compression spring on top of hex nut as shown in
figure 24.
■ Place depth control knob on top of compression spring.
■ Carefully compress spring by pushing down on top of
depth control knob.
■ With spring compressed, align hex shaped recess in
depth control knob with hex nut.
■ Thread depth control knob clockwise onto depth adjust-
ment rod.
■ Turn depth control knob until desired depth of cut is
reached.
Do not replace depth control knob without compression
spring.
HEX
NUT
DEPTH
ADJUSTMENT ROD
COMPRESSION
SPRING
DEPTH
CONTROL KNOB
WARNING:
Replacing depth control knob without compression spring
could result in depth control knob and hex nut vibrating off
depth adjustment rod during use. This situation could
cause motor to separate from router base, resulting in
possible serious personal injury.
Fig. 24
1/4 in.
(6.4 mm)
in cm
1
2
3
9
3
1
WASHER