


Page 9
ADJUSTMENTS
WARNING:
Your router should never be connected to power supply
when you are assembling parts, making adjustments,
installing or removing cutters, or when not in use.
Disconnecting your router will prevent accidental starting
that could cause serious injury.
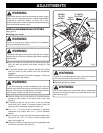
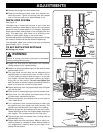
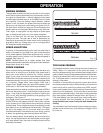
INSTALLING/REMOVING CUTTERS
See Figure 3.
■ Unplug your router.
WARNING:
Failure to unplug your router could result in accidental
starting causing serious injury.
WARNING:
To prevent damage to the spindle or spindle lock, always
allow motor to come to a complete stop before engaging
spindle lock.
■ Lay your router on its side with the collet facing away
from you and the spindle lock button facing up.
See
Figure 3.
■ To activate spindle lock, depress spindle lock button
and turn collet nut with wrench until lock mechanism
interlocks.
NOTE: Once spindle lock button engages, continue to
depress spindle lock button.
WARNING:
If you are changing a cutter immediately after use, be
careful not to touch the cutter or collet with your hands or
fingers. They will get burned because of the heat buildup
from cutting. Always use the wrench provided.
■ Remove cutters by turning collet nut counterclockwise
enough to allow cutter to slip easily from collet.
See
Figure 3.
■ If installing cutter for the first time, it can be installed
once collet nut is loose. If changing cutters, cutter will
easily slip from collet after loosening collet nut.
■ The 1/2 in. (13 mm) collet is machined to precision
tolerances to fit cutters with 1/2 in. (13 mm) diameter
shanks.
■ Insert shank of cutter into collet until shank bottoms out,
then pull it out 1/16 in. (1.6 mm) to allow for expansion
when the bit gets hot.
■ Tighten the collet nut securely by turning clockwise with
the wrench provided.
See Figure 3.
WARNING:
If collet nut is not tightened securely, cutter may come out
during use causing serious personal injury.
■ Release spindle lock button.
WARNING:
Do not use cutters with undersized shanks. Undersized
shanks will not tighten properly and could be thrown from
tool causing injury.
COLLET
NUT
A
B
C
D
E
F
24
Fig. 3
SPINDLE
LOCK BUTTON
TO TIGHTEN
COLLET NUT
TO LOOSEN
COLLET NUT
CUTTER
24 mm
WRENCH
DEPRESS
TO LOCK
SPINDLE