


7
CONNECTED LED is not lit, check for
correct cable connections.
6. Press the appropriate control buttons
to select the desired charge rate and
battery type.
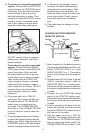
7. To disconnect the charger, unplug its
power cord before attempting to discon-
nect the charger clamps. Then, standing
away from the battery, remove the out-
put clamp from the NEGATIVE battery
post. Finally, remove the output clamp
from the POSITIVE battery post.
8. Clean and store the charger in a dry
location.
USING ENGINE START
Your battery charger can be used to jump
start your car if the battery is low. Fol-
low these instructions on how to use the
ENGINE START feature.
IMPORTANT: Follow all safety instructions
and precautions when charging your bat-
tery. Wear complete eye protection and
clothing protection. Charge your battery
in a well-ventilated area.
IMPORTANT: Using the ENGINE START
feature WITHOUT a battery installed in
the vehicle could cause damage to the
vehicle’s electrical system.
1. For battery connections, see page 5
and follow instructions 1 – 6 of CHARG-
ING BATTERY IN THE VEHICLE. With
the charger plugged in and connected
to the battery of the vehicle, press
the CHARGE START button until the
ENGINE START LED is lit. Only the
ENGINE START, CHARGING, CON-
NECTED, and VOLTAGE LEDs should
be lit.
2. Crank the engine for no more than 5
seconds. If engine does not start, wait
3 minutes before cranking again.
3. After the engine starts, unplug the power
cord before disconnecting the output
clamps from the battery.
4. Clean and store the charger in a dry
location.
NOTE: During the starting sequence listed
above, the charger is set to one of three
states.
1. Wait for cranking - The charger waits
until the engine is actually being cranked
before delivering 80 amps for engine
start. The charger delivers charge at a
rate of up to 10 amps while waiting and
will reset if the engine is not cranked
within 15 minutes. (If the charger resets,
it sets itself for a SMALL BATTERY
charge and REGULAR battery type.)
While waiting for cranking, the digital
display shows the battery voltage (it
can’t be set to percent).
2. Cranking - When cranking is detected,
the charger will automatically deliver up
to its maximum output (at least 80A)
as required by the starting system for
up to 5 seconds or until the engine
cranking stops. The digital display
shows a countdown of the remaining
crank time in seconds. It starts at 5 and
counts down to 0.
3. Cool Down - After cranking, the char-
ger enters a mandatory 3-minute (180
second) cool down state. During this
period, no settings can be changed. The
buttons are ignored. The digital display
indicates the remaining cool down time
in seconds. It starts at 180 and counts
down to 0. The ENGINE START LED
blinks once every second. During the
cool down period, no current is deliv-
ered to the battery. After 3 minutes, the
ENGINE START LED will stop blinking
and will light continuously, indicating that
another crank cycle can be started. The
digital display will change from display-
ing the countdown back to displaying
the battery voltage. The CHARGING
LED will then be lit.
ENGINE STARTING NOTES:
• If the battery is disconnected during
the cool down period, the charger will
reset.