


- 9 - Woodstock Intl., Inc. D2796
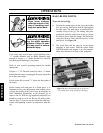
ADJUSTMENTS
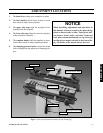
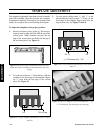
4. Insert a drawer side under the front clamp. This
piece will be vertical. Adjust the height so the top
end of the vertical piece overlaps the end of the hor-
izontal piece. At this point, it is not critical that the
pieces be flush.
5. Clamp the side in place.
6. Release the horizontal piece and butt it against the
side piece mounted in the front of the jig. Ensure
that the horizontal piece remains centered under the
template fingers. Re-clamp in place.
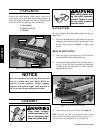
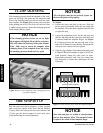
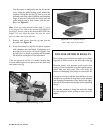
7. Release the side piece and slide it to the right so that
the edges of the pieces are offset by one full width
of a template finger. With the included template,
the measurement of offset is
1
⁄2". Re-clamp in place.
See Figure 9B.
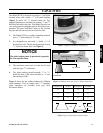
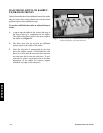
8. Slide the front side stop against the side piece edge
and tighten down. Be careful not to over tighten.
9. Check to make sure the drawer front is centered
under the template finger, the drawer side is offset
from the drawer front by the width of a template fin-
ger, and that all edges are flush against one another.
Also, make sure the drawer edges are flush against
the side stops.
10. Your jig set up should look like Figure 10.
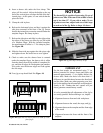
NOTICE
The dovetail jig is capable of processing (2) sets of
joints at one time if the sum of the widths of both
sets is less than 12". If you wish to make (2) sets
of joints at one time, adjust both sets of side stops
at each end of the jig. Refer to Steps 1-9 above.
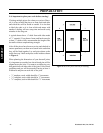
IMPORTANT
For the best results, we recommend using
3
⁄4" (or
thicker) material for drawer fronts and backs and
material approximately
1
⁄2" (or slightly thicker) for
drawer sides. Make sure there is no more than
1
⁄4"
difference in wood thickness between the front/back
and the sides. Make sure when preparing your lum-
ber for dovetailing that all materials are squared uni-
formly to 90°. Lumber that isn’t square will just
about guarantee unsatisfactory results.
It is also essential that all adjustments of the jig be
set exactly parallel. Before making a cut, inspect:
1. Alignment between front and side workpieces.
2. Alignment between the wood, the stops, and jig.
3. Alignment between the template and the front edge
of the wood.
4. Alignment between the fence and the front of the
template.
Figure 10. Jig side stops correctly set up.
x
x x
x
x
x
Figure 9B. Offset the two drawer pieces by width of a tem-
plate finger.
Side Stops