


– 4 –
INSTALLATION CODES AND STANDARDS
Your Vulcan Electric Tilting Braising Pan must be installed in accordance with:
1. State and local codes, or in the absence of local codes, with:
2. National Electrical Code ANSI/NFPA-70 (latest edition).
3. ANSI NFPA Standard #96, "Vapor Removal from Cooking Equipment," (latest edition), available
from the National Fire Protection Association, Batterymarch Park, Quincy, MA 02269.
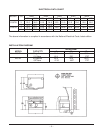
LEVELING AND ANCHORING TILTING BRAISING PAN
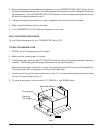
1. Place tilting braising pan in the installation position.
2. Place a carpenter's level on top of the braising pan and turn the adjustable feet to level braising pan
side-to-side and front-to-back.
3. Mark hole locations on the floor through the anchoring holes provided in the rear flanged adjustable
feet.
4. Remove tilting braising pan from installation position and drill holes in locations marked on the floor.
(See INSTALLATION DIAGRAM in this manual.) Insert proper anchoring devices (not supplied).
5. Place tilting braising pan back in the installation position.
6. Place carpenter's level on top of braising pan and re-level side-to-side and front-to-back.
7. Bolt and anchor tilting braising pan securely to the floor.
8. Seal bolts and flanged feet with silastic or equivalent compound.
ELECTRICAL CONNECTIONS
WARNING: ELECTRICAL AND GROUNDING CONNECTIONS MUST COMPLY WITH THE
APPLICABLE PORTIONS OF THE NATIONAL ELECTRICAL CODE AND/OR OTHER LOCAL
CODES.
WARNING: DISCONNECT THE ELECTRICAL POWER SUPPLY AND PLACE A TAG AT THE
DISCONNECT SWITCH TO INDICATE THAT YOU ARE WORKING ON THE CIRCUIT.
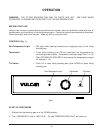
The wiring compartment is located behind the control panel. Remove the wiring compartment cover
and make electrical connections per the wiring diagram located inside the control housing cover panel.
The braising pan must be grounded in accordance with requirements of the National Electrical Code
or applicable local code.
Replace wiring compartment cover.