


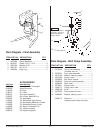

© 1995 Wagner Spray Tech 17 All rights reserved.
TROUBLESHOOTING
Problem Cause Remedy
The sprayer does not start up.
The sprayer starts up but does not draw in
paint when the PRIME/SPRAY knob is set
to PRIME.
The sprayer draws up paint but the pressure
drops when the gun is triggered.
The spray gun will not shut off.
The spray gun leaks.
The tip assembly leaks.
The spray gun will not spray.
The paint pattern is tailing.
The thermal overload tripped and shut off the
sprayer.
1. The sprayer is not plugged in.
2. The ON/OFF switch is set to OFF.
3. A fuse is blown in the sprayer.
4. Low or no voltage is coming from the
wall plug.
5. The sprayer was turned off while still
under pressure.
6. The extension cord is damaged or has
too low a capacity.
7. The thermal overload on the sprayer is
tripped.
8. There is a problem with the motor.
1. The unit will not prime properly or has
lost prime.
2. The paint bucket is empty or the suction
tube is not totally immersed in the paint.
3. The suction filter is clogged.
4. The suction tube is loose at the inlet
valve.
5. The inlet valve is stuck.
6. The outlet valve is stuck.
7. The PRIME/SPRAY valve is plugged.
8. The inlet valve is worn or damage.
9. There is a problem with the diaphragm.
10. The hydraulic oil level is low or empty.
1. The spray tip is worn.
2. The suction set filter is clogged.
3. The gun or spray tip filter is plugged.
4. The paint is too heavy or coarse.
5. The outlet valve assembly is dirty or
worn.
6. The inlet valve assembly is damaged or
worn.
1. The inlet or outlet valve ball or ball seat
is worn.
2. Foreign matter or paint has built up
between the ball and the seat.
1. Internal parts of the gun are worn or
dirty.
1. The tip was assembled incorrectly.
2. A seal is worn.
1. The spray tip, the gun filter or the tip
filter is plugged.
2. The spray tip is in the CLEAN position.
1. The pressure is set too low.
2. The gun, the tip, or the suction filter is
plugged.
3. The suction tube is loose at the inlet
valve.
4. The tip is worn.
5. The paint is too thick.
1. The motor overheated.
2. The extension cord is too long or is too
small a gauge.
3. Paint has built up on the motor.
4. The motor was started while the sprayer
was under pressure.
5. The sprayer was sitting in the hot sun.
1. Plug the sprayer in.
2. Turn the ON/OFF switch to ON.
3. Replace the blown fuse with the proper
replacement.
4. Properly test the power supply voltage.
5. Turn the PRIME/SPRAY knob to
PRIME.
6. Replace the extension cord.
7. Allow the motor to cool and move the
sprayer to a cooler spot.
8. Take the sprayer to a Wagner Autho-
rized Service Center.
1. Try to prime the unit again.
2. Immerse the suction tube in paint.
3. Clean the suction set filter.
4. Clean the tube connection and tighten it
securely.
5. Clean the inlet valve.
6. Clean the outlet valve and replace any
worn parts.
7. Take the sprayer to a Wagner Autho-
rized Service Center.
8. Replace the inlet valve.
9. Take the sprayer to a Wagner Autho-
rized Service Center.
10. Take the sprayer to a Wagner Autho-
rized Service Center.
1. Replace the spray tip with a new tip.
2. Clean the suction set filter.
3. Clean or replace the proper filter.
Always keep extra filters on hand.
4. Thin or strain the paint.
5. Clean or replace the outlet valve
assembly.
6. Replace the inlet valve.
1. Take the sprayer to a Wagner Autho-
rized Service Center.
2. Take the sprayer to a Wagner Autho-
rized Service Center.
1. Take the sprayer to a Wagner Autho-
rized Service Center.
1. Check the tip assembly and assemble
properly.
2. Replace the seal.
1. Clean the spray tip, gun filter or tip filter.
2. Put the tip in the SPRAY position.
1. Increase the pressure.
2. Clean the filters.
3. Tighten the suction tube fitting.
4. Replace the spray tip.
5. Thin the paint.
1. Allow to cool for 30 minutes.
2. Allow to cool for 30 minutes and replace
the extension cord with a shorter
extension or a thicker gauge cord.
3. Clean the paint from the motor.
4. Restart the sprayer in the PRIME mode.
5. Move the sprayer out of the sun.
NOTE: When the PRIME SPRAY valve is on SPRAY ( ) and there is flow through the return tube, remove the PRIME/SPRAY valve
and clean or replace IT.
NOTE: The electric motor should always be kept clean and dry. Paint acts as an insulator. Too much paint on the motor will cause the
motor to overheat.