


5
GB
Preparing the coating material
Observe the manufacturer’s instructions for the use of the coating
material on the paint tin or on the technical instruction sheet.
Coating material purity:
An absolute pre-condition for the trouble-free operation of the
ne-spray system is that the coating material is uncontaminated.
If you have doubts as to the purity of the coating material, we
recommend that you rst lter it through a ne sieve.
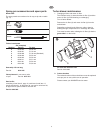
Table of viscosities and nozzle sets
Coating material
Solvent-based
lacquer paints
Water-soluble
lacquer paints
Wood preservatives
(scumble, mordants, etc).
Multi-color effect materials,
multi-color paint
Texture and effect
paints
Viscosity DIN-s
(4 mm DIN cup)
15 - 45
observe manufacturer’s
instructions
undiluted
observe manufacturer’s
instructions
observe manufacturer’s
instructions
3 - 4
4 - 5
2 - 3
6 - 7
5 - 6
Nozzle set
No.
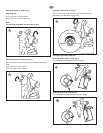
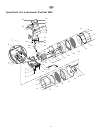
Starting operation
Before connecting to the mains supply make sure that the mains
voltage corresponds to the operating voltage on the rating plate.
The unit must be connected with a properly earthed shockproof
socket.
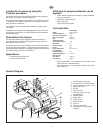
1. Screw air hose end (anti-kink spring) onto the turboblower.
Couple air hose to the paint spray gun.
2. Open closing lever on the paint container, remove paint
container.
3. Fill paint container with coating material.
4. Check that the paint container seal is clean and is seated
correctly.
5. Clip the container onto the spray gun and secure with the
closing lever.
6. Switch the turbo-blower on.
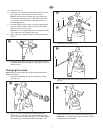
7. Point the paint spray gun at the object to be sprayed.
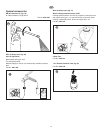
8. Determine the settings for the spray pattern, spray
jet width, amount of material, amount of air and
ascending feed pipe settings, see g. 2 - 8 and the
description page 5/6.
9. Operate trigger on the paint spray gun.
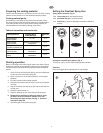
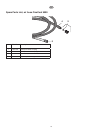
Setting the FineCoat Spray Gun
Spray pattern selection (g. 2)
A = vertical at jet for horizontal surfaces
B = horizontal at jet for vertical surfaces
C = Round jet for corners and edges and places difcult to
access.
ABC
2
Setting the required spray pattern (g. 3)
Turn the air cap (1) to the required spray pattern position.
Attention:
Never pull trigger while adjusting the air cap settings.
1
3