


18
Maintenance
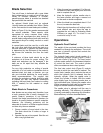
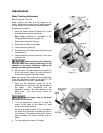
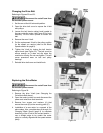
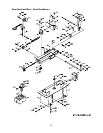
Figure 21
Changing Blades
Use leather gloves when
changing the saw blade to protect your
hands from cuts and scratches. Use
protective eye wear that meets ANSI
Specification Z87.1
Disconnect the cut-off saw
from its electrical power source.
Referring to Figure 21:
1. Raise the saw head (A). Set the feed rate
control knob (B) to zero to lock the hydraulic
cylinder, which will hold the saw head in
place.
2. Open two hinged blade wheel covers (C).
3. Remove the blade guard (D) and column
blade cover (E).
4. Turn the blade tension handle (F) counter-
clockwise until the blade (G) hangs loose.
5. Using leather gloves to prevent cuts and
scratches, pull the blade (G) off the drive
wheels (H) and out of the blade guides (J).
Store the removed blade carefully before
proceeding.
6. Slide the new blade into the blade guides
(J), then loop the blade (G) around the drive
wheels (H) such that the teeth face towards
the back and the smooth side faces towards
the front.
This will permit the vertical side of the teeth
to contact the workpiece first.
7. Push the blade (G) so it is seated against
the shoulders of the wheels (H).
When it is seated against the shoulder, turn
the blade tension handle (F) clockwise to
increase the tension. Do not over-tension
the blade; tighten it just enough so it does
not slip while cutting.
8. When the blade is properly tensioned,
reconnect the saw to the electrical power
source.
9. Check and adjust the tracking of the blade.
Refer to Blade Tracking Adjustment (on
page 14) if necessary.
10. Close the wheel covers (C).
11. Put 2 to 3 drops of oil on the blade.