


Installation
2–4 975-0187-01-01
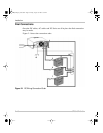
5. Route the wiring to the batteries and to the XC Series, but don’t connect it yet.
Avoid routing wiring through an electrical distribution panel, battery isolator, or
other device that will add voltage drops.
6. Install crimp lugs on each end of the battery cables using the crimp
manufacturer’s instructions and tool.
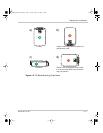
7. Install rubber boots over the charger end of the DC cables.
Xantrex recommends that you install rubber boots over the XC Series DC
terminals to provide drip protection. Follow the procedure on page 2–14 to
install rubber boots.
8. Route the battery temperature sensor from each battery to the charger location.
9. Proceed to “Pre-Installing AC Wiring”.
Pre-Installing AC Wiring
Before connecting AC wiring, make sure the AC source circuit is protected by a
breaker switch of the correct size and type, to comply with the electrical code for
your location and application.
To install AC wiring:
1. Disconnect the AC source by turning off the breaker feeding the circuit,
unplugging from shorepower and disconnecting any other power sources (such
as a generator).
2. Plan the route that the AC wiring will follow from the source (usually an AC
distribution panel) to the XC Series. Measure and cut the required length of
three-conductor cable.
For example, in North America for 120 VAC use a 14 AWG wire with a 15 A
breaker; or typically in Europe for 230 VAC use either a 2.5mm
2
wire with a
16 A, double pole breaker or fuse or use 1.5 mm
2
wire with a 10 A, double pole
breaker or fuse. Note that every jurisdiction will have different requirements, so
see the regulations for your local jurisdiction to determine which wire size and
type is correct.
Allow some extra length for connections and to provide slack.
3. Make the AC connections to the back of the charger when it is sitting on a table
or other convenient work surface.
Route the AC cables to the source after the charger is mounted in position.
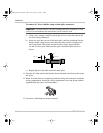
4. Unscrew the wiring compartment cover from the left rear of the XC Series to
expose the AC wiring access hole.
XC_Charger_Owner.book Page 4 Friday, August 12, 2005 3:23 PM