


12
Operating Instructions and Parts Manual
Airless Paint Systems
www.chpower.com
Service (Cont.)
Disconnect hose from fluid section.
5. Disconnect and remove fluid section
from gearbox, including Connecting
Rod Assy. (See"Fluid Pump
Disconnect, page 10)
6. Remove four nuts (page 20, Item
23) on the engine side of (Item 18)
from screws (Item 24) which pass
through spacer tubes (Item 15). This
will allow removal of Gearbox &
Clutch Assembly from "Holder-
Manifold" (Item 18).
7. Pull the cog belt loose from the
engine shaft cog pulley and remove
the gearbox/clutch assembly from
the rest of the unit.
8. Place gearbox in vice by gripping
the flat part of the drive crank
allowing the clutch assembly to
face up. Use caution and not allow
gearbox to swing and damage
casting against vice.
9. Hold coupling screw, with 13/16"
wrench, then with 5/16" allen
wrench, screw differential screw
out of coupling screw and gearbox
shaft.
10.Screw large end of differential
screw into coupling nut assembly
and pull out of clutch assembly.
11.The clutch can now be removed
Spacers, removable spacer,
replacement clutch, bearings,
retaining rings should be inspected
and replaced if needed. (Items 3
through 8 on Parts List).
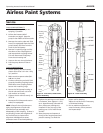
Install new clutch as follows:
1. With gearbox held as described in
Step 8 above, place first spacer and
bearing onto gearbox shaft.
2. Insert snap rings (2 into recesses of
cog pulley portion of clutch. Place
cog pulley portion of clutch with
cog belt attached onto shaft.
3. Place second spacer into cog pulley
portion of clutch. This spacer will
rest on the first bearing installed.
4. Insert second bearing on top of
upper snap ring.
5. Lay removable spacer on top of last
bearing. If the clutch air gap is
larger than .028", do not use
removable spacer. Put spacer over
removable spacer, if used, and top
bearing.
6. Place coil portion of clutch down
onto cog pulley portion of clutch
and center on gearbox shaft.
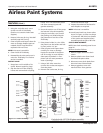
7. Screw differential screw into
coupling screw and nut until 1/16"
is showing.
8. Push coupling nut assembly into
clutch assembly until it comes to a
positive stop. (Differential screw
comes into contact with the
threaded gearbox shaft.)
9. With 13/16" wrench on coupling
screw and 5/16" allen wrench in
differential screw, simultaneously
with both wrenches screw coupling
nut assembly into gearbox shaft by
turning clockwise until a positive
stop is reached.
10. Hold coupling nut assembly and
tighten diffential screw to 30 ft.-lbs.
This will expand the coupling
assembly, thereby holding the
clutch assembly to gearbox shaft.
Turn clutch observing clutch gap.
The pulley should turn freely with
a gap of .012 to .024" between the
two clutch faces. If the gap is
greater than .028, remove the
spacer. Reassemble and check gap
for proper clearance.
11. Place cog belt over cog pulley
portion of clutch. Loosen set screws
until set screws are approximately
1/4" above block tensioner.
12. Reassemble the spacers onto
screws. Simultaneously lift gearbox
assembly with clutch into position
by placing cog belt over engine
shaft log pulley and inserting the
four screws into Holder-Manifold
and replacing nuts (4). Tighten nuts
to hold assembly in place.
13. Slightly loosen screws (4).
14. Evenly tighten Set Screws until
flush with tip of block tensioner..
Check tension on cog belt by
pressing hard with thumb. Proper
tensioning should allow for
approximately 1/8". If belt is too
loose, tighten set screws further.
15. Replace connecting rod and fluid
section. Preplace front cover on
gearbox. Connect hose to fluid
section.
16. Connect the clutch and board leads.
Connect spring to spacer tube.
17. Replace the splash shield.
18. Test the clutch for proper operation
19. Replace clutch covers.
Maintenance
REGULAR MAINTENANCE
1. Always stop the pump at the
bottom of its stroke when you take
a break or at the end of the day.
This helps keep material from
drying on the rod and damaging
the packings.
2. Keep the displacement pump
packing nut/wet cup1/3 full of TSO
(Throat Seal Oil) at all times. The
TSO helps protect the packings and
rod.
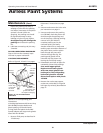
3. Inspect the packing nut daily.
Your pump has a patented "Triple
Life Packing System". Packing life
will be extended a minimum of
3 times if the following Packing
Tightening Procedure is
followed:
AL2810