


7
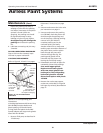
Airless Paint Systems
Operating Instructions and Parts Manual
www.chpower.com
Operation
STARTING UP
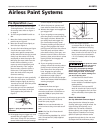
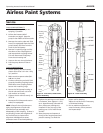
1. Learn the functions of the controls
(see “How to Spray / Important
Components” for more
information).
2. Prepare the Material
a. Prepare the material according
to material manufacturer's
recommendations.
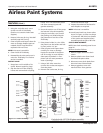
b. Place the pump or suction tube
into the material container.
3. Start the sprayer.
a. Prime/PR Valve must be open in
the priming position.
b. Pressure Control Knob must be
in low pressure position.
c. Follow procedure under “How
to Flush,” page 5, Steps 6 to 12.
To stop the unit in
an emergency or
before performing any service or
maintenance procedure follow the
Pressure Relief Procedure on page 3 to
relieve the fluid pressure.
4. Prime the pump.
a. Allow pump to operate until
paint comes from gun.
b. Release the trigger and engage
the gun safety latch.
c. Turn Prime Valve OPEN to the
prime position ensuring the
pressure is released from the
system.
d. Turn Pressure Control Knob to
minimum pressure.
e. Install spray tip onto gun.
f. Close the prime valve to the
pressure position.
g. Turn the pressure control knob
to desired spray pressure.
h. Disengage the gun safety lock
and you are ready to start
spraying.
If you spray paint
into the paint
bucket, always use the lowest spray
pressure and maintain firm metal-to-
metal contact between gun and
container.
5. Adjust pressure.
a. Turn the Pressure Control Knob
clockwise to increase pressure and
counterclockwise to decrease
pressure.
b. Always use the lowest pressure
necessary to completely atomize
the material.
Operating the
sprayer at higher
pressure than needed wastes material,
causes early tip wear and reduces the
life of the spray equipment.
c. If more coverage is needed, use
a larger tip rather than increasing
the pressure.
d. Check the spray tip. The tip size
and angle determine the pattern
width and flow rate.
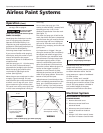
6. Reduce clutch wear.
a. The first 50 feet of airless spray
hose should be 3/8", the larger
diameter works as a pulsation
damper and saves unnecessary
cycling of the clutch. A minimum
of 100 feet of hose should be used.
b. Adjust the Engine Speed and
Pump Pressure. First set the
throttle lever to the maximum
RPM setting (fully left). Trigger the
gun onto a test paper to check the
spray pattern and atomization.
Adjust the Pressure Control Knob
until you get a good pattern.
Reduce RPM of engine to support
pressure without overworking
engines.
7. Clean tip if clogged. If tip is
becoming worn, replace it. Worn
tips waste paint, cause overspray,
make cutting-in difficult, and
decrease sprayer performance.
IMPORTANT: Always follow the
Pressure Relief Procedure on page 3
before servicing unit.
Never hold your
hand, body, fingers,
or hand in a rag in front of the spray
tip when cleaning or checking it for a
cleared tip. Always point the gun
toward the front or into a waste
container when checking to see if the
tip is cleared or when using a self-
cleaning tip.
a. Follow the Pressure Relief
Procedure on page 3.
b. Clean the front of the tip
frequently (with toothbrush only)
during the day to keep material from
building up and clogging the tip.
c. To clean and clear a tip if it clogs,
refer to the separate instruction
manual received with your gun and
nozzle.
NOTE: When pausing during a paint
job, keep tip clean by locking the gun
and submerging the tip in a small
bucket of paint thinner. This will help
reduce buildup and drying of paint in
tip, tip guard, and gun.
Clean a clogged
standard flat tip
only after it has been removed from
the gun. Follow the Pressure Relief
Procedure on page 3.
8. When shutting off the sprayer,
follow this procedure.
a. Whenever you stop spraying, even
for a short break, follow the Pressure
Relief Procedure on page 3.
b. Clean the tip and gun as
recommended by your separate gun
instruction manual.
c. Flush the sprayer at the end of each
work day if the material you are
spraying is water-based, or if it could
harden in the sprayer overnight. See
"Flushing" on page 4. Use a
compatible solvent to flush, then fill
the pump and hoses with an oil based
sovent such as mineral spirits.
AL2810