


Airless Paint Systems
5
Operating Instructions and Parts Manual
Pre-Operation (Cont.)
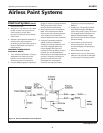
5. Open the prime valve to the open -
"Priming Position". This will allow
for an easy start. Refer to Figure 1
on page 4.
6. Turn the engine ON/OFF switch to
ON.
7. Move the choke toward the closed
position as per Figure 3.
8. Move the throttle lever slightly to
the left as per Figure 3.
9. Turn the fuel valve ON as per Figure
3. Pull the start rope. Pull the
engine over against compression
stroke and then let the rope rewind
slowly into the starter. Pull firmly
and rapidly to start the engine. Do
NOT drop the rope. Hold onto the
handle while rewinding, or the
rope may rewind improperly and
jam the assembly. If the engine
does not start, open the choke a
little more. If the engine floods,
open the choke all the way and
continue cranking.
10. After the engine is warm, gradually
close the choke lever, increase the
RPM of engine slightly by moving
throttle to the left. Close the prime
valve. Refer to Figure 1.
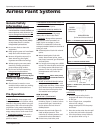
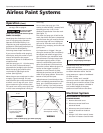
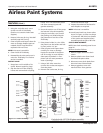
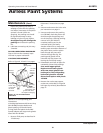
11. Point the gun into the metal pail
and hold a metal part of the gun
firmly against the pail Refer to
Figure 4.
12. Disengage the gun trigger lock and
squeeze the gun trigger. At the
same time, slowly turn the pressure
control knob clockwise just enough
www.chpower.com
to move liquid at low pressure.
13. Allow the pump to operate until
clean solvent comes from the gun.
14. Release the trigger and engage the
gun trigger lock.
15. If you are going to start spraying,
place the pump or suction tube into
the supply container. Release the
gun safety latch and trigger the
gun into another empty, metal
container, holding a metal part of
the gun firmly against the metal
pail (Figure 4) and force the solvent
from the pump and hose. When
paint starts coming from gun, turn
pressure control knob to minimum
pressure, place prime valve in prime
(open) position and engage the
gun trigger lock.
16. If you are going to store the
sprayer, remove the suction tube or
pump from the solvent pail force
the solvent from the pump and
hose. Engage the gun safety
latch and refer to the "Storage"
Procedure on page 4, Step 5.
17. Whenever you shut off the sprayer
follow the Pressure Relief Procedure
warning on page 3.
SETTING UP
1. Connect the hose and gun.
a. Remove the plastic cap plug from
the outlet and screw a conductive or
grounded 3000 psi spray hose onto
fluid outlet.
b. Connect an airless spray gun to the
other end of the hose, but do not
install the spray tip yet!
NOTE: Do not use thread sealer on
swivel unions as they are made to self
seal.
NOTE: The first 50' of hose should
always be 3/8".
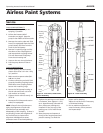
2. Fill the Packing Nut/Wet Cup 1/3 full
with Throat Seal Oil (TSO) supplied.
See Figure 5.
3. Check the engine oil level.
a. Unscrew the oil fill plug. The
dipstick is attached to the plug.
b. Without threading the plug into
place, check to be sure the oil is up
to the top mark on the dipstick.
c. If oil is needed, refer to engine
manual.
4. Fill the fuel tank.
Fuel spilled on a hot
surface can cause a
fire or explosion and cause serious
bodily injury and property damage.
Always shut off engine and let it cool
before filling the tank, and carefully
follow steps a to c below, making sure
you do not spill any fuel.
a. Close the fuel shutoff valve.
b. Use only clean, fresh, well-
known brands of unleaded regular
grade gasoline.
c. Remove the fuel cap and fill
tank. Be sure the air vent in the fill
cap is not plugged so fuel can flow
to the carburetor, then replace the
cap.
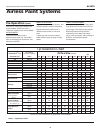
SPRAY TIP SELECTION
See Tip Selection Chart on Page 6.
Spray tip selection is based on paint
viscosity, paint type, and job needs. For
light viscosity (thin paints), use a
smaller tip. For heavier viscosities
(thicker paints), use a larger tip size.
Spray tip size is based on how many
gallons of paint per minute can be
sprayed through the tip. Do not use a
tip larger than the maximum pump
AL2810
Figure 4 - Spray Gun Against Metal
Container
Figure 5 - Applying throat seal oil