


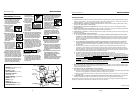


1. Disconnect the
air supply from
the nailer.
2. Remove all nails
from the magazine
(see Loading/
Unloading).
3.
Make sure the trigger
and Work Contact
Element (WCE) move
freely up and down
without sticking or
binding.
4. Reconnect air
supply to the
nailer.
5.
Depress the WCE
against the work
surface without
pulling the trig-
ger. The nailer
MUST NOT
OPERATE. Do not use the tool if it
operates without pulling the trigger.
Personal injury may result.
6. Remove the nailer
from the work sur-
face. The
WCE
must
return to its original
down position.
Depress the trigger.
The nailer MUST
NOT OPERATE. Do not use the tool if
it operates while lifted from the work
surface. Personal injury may result.
7. Pull the trig-
ger and
depress the
WCE
against
the work sur-
face. The nail-
er MUST OPERATE if bump trigger is
installed. The nailer MUST NOT OPER-
ATE if sequential trigger is installed.
8. Depress the
WCE
against
the work sur-
face. Pull the
trigger. The
nailer MUST
OPERATE.
LOADING/UNLOADING THE NAILER
1. Always connect the tool to the air
supply before loading fasteners.
OIL DAILY
Oxygen
Oxygen
Nitrogen
Nitrogen
Hydrogen
Hydrogen
Carbon Dioxide
C
arbon Dioxide
OIL DAILY
Oxygen
Nitrogen
Hydrogen
Carbon Dioxide
Movement
O
I
L
D
A
I
L
Y
O
I
L
D
A
I
L
Y
O
x
y
g
e
n
O
x
y
g
e
n
N
i
t
r
o
g
e
n
N
i
t
r
o
g
e
n
H
y
d
r
o
g
e
n
H
y
d
r
o
g
e
n
C
a
r
b
o
n
D
i
o
x
i
d
e
C
a
r
b
o
n
D
i
o
x
i
d
e
OIL DAILY
Oxygen
Nitrogen
Nitrogen
Hydrogen
Hydrogen
Carbon Dioxide
Carbon Dioxide
Each time the Work Contact Element is
depressed, a nail is driven into the work
surface. Extreme care should be taken
because a nail will be driven when the
WCE is pressed against any surface.
Since the tool can be actuated without
removing the finger from the trigger, this
is considered to be a less restrictive mode,
suitable for more experienced users.
MODE CONVERSION
To convert the tool from one mode to
the other:
1. Remove o-ring on the side of trigger
pin.
2. Remove trigger pin, trigger, and trig-
ger spring (if included).
3. Switch out only the trigger.
4. Replace trigger spring (if included),
trigger, trigger pin, and o-ring.
Do not attempt to modify the trigger
components in any manner and do not
attempt to use any other trigger com-
ponents other than those intended for
this tool.
See the tool manual for further Safety
and Operation information.
Contact your Campbell Hausfeld repre-
sentative if you have any questions.
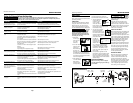
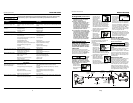
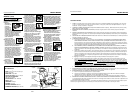
ADJUSTING NAIL PENETRATION
The tool is equipped with an adjustable
depth of drive feature. This feature allows
the user to determine how deep the fas-
tener will be driven into the work surface.
a. Adjust operating pressure so nails are dri-
ven consistently. Do not exceed 120 psi.
b. Turn thumbwheel to decrease the gap
between tip of WCE and nose to maxi-
mize depth; increase the gap to mini-
mize depth.
c. Make sure trigger
and work contact ele-
ment (WCE) move
freely up and down
without binding or
sticking after each
adjustment.
WORK CONTACT ELEMENT (WCE)
Check the
operation
of the Work Contact Element (WCE) trip
mechanism before each use. The WCE
must move freely without binding
through its entire travel distance. The
WCE spring must return the WCE to its
fully extended position after being
depressed. Do not operate the nailer if
the WCE trip mechanism is not operating
properly. Personal injury may occur.
2. Pull the door latch
down andopen the
door. Open maga-
zine cover.
3. Check the nail plat-
form adjustment.
Change nail plat-
form settings by
turning knob on the
post and twisting to the correct setting:
The nail platform must be set for the
length of nails to be used or the nails
will not feed properly.
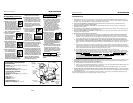
4. Load the coil of nails
over the post in the
magazine. Make sure
to uncoil enough
nails to reach the
feed pawl. The first
nail should be placed in front of the
front tooth on the feed pawl in the
driver channel and the nail heads
must be in the slot in the nose.
5. Close the magazine
cover and door latch.
6. Always unload all fasteners before
removing tool from service.
Unloading is the reverse of loading,
except always disconnect the air hose
before unloading.
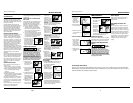
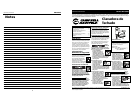
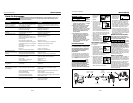
SHINGLE GUIDE ADJUSTMENT
1. Disconnect the
air supply from
the nailer.
2.
Loosen the two screws on the shingle
guide under the magazine.
3. Place the shingle
guide against the
front edge of the
shingle.
4. Adjust the shingle guide until the
desired shingle exposure is achieved.
5. Tighten the two screws on the shin-
gle guide.
CLEARING A JAM FROM THE NAILER
1. Disconnect the
air supply from
the nailer.
Model RN164500
Operating Instructions
4
OIL DAILY
Oxygen
Oxy
g
en
Nitrogen
N
i
troge
n
Hydrogen
Hydrogen
Carbon Diox
ide
C
ar
bon
Diox
ide
4. Coloque una bobina
de clavos en el car-
gador sobre la barra
del cargador.
Asegúrese de desenr-
rollar suficientes clavos hasta alcan-
zar el trinquete de avance. El primer
clavo debe colocarse delante del
diente delantero en el trinquete de
avance, en el canal del expulsador y
las cabezas de los clavos deben estar
en la ranura de la nariz del clavador.
5. Cierre el retén y la
tapa del cargador.
6.
Para descargarla haga lo contrario
que para cargarla, excepto que siem-
pre debe desconectar la manguera
de aire antes de comenzar.
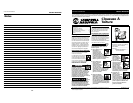
AJUSTE DE LA GUIA PARA TEJAS DE
MADERA
1. Desconecte la
clavadora de la
fuente de sum-
inistro de aire.
2.
Afloje los dos tornillos de la guía que
se encuentran bajo el cargador.
3. Coloque la
guía contra
el borde
delantero de
la teja.
4. Ajuste la guía de tejas hasta lograr la
exposición deseada para la teja.
5. Apriete los dos tornillos de la guía
para tejas de madera.
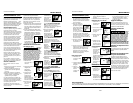
QUE HACER CUANDO LA CLAVADO-
RA TENGA UN CLAVO ATASCADO
1. Desconecte la
clavadora de la
fuente de sumin-
istro de aire.
2. Tire el retén de la
portezuela hacia
abajo y abra la
tapa del cargador.
3. Saque los clavos
de la nariz del
clavador.
4. Sujete el clavo
atascado con unas
pinzas y extráiga-
lo del clavador.
Metodo alterno:
1. Inserte un
destornillador
en la nariz del
clavador.
Empuje hacia
arriba la hoja
del expulsador a fin de liberar el
clavo atascado.
2. Sujete el clavo
con unas pin-
zas y sáquelo
del clavador.
Mantenimiento
Limpieza del Clavador
1. Desconectar
el suministro
de aire del
clavador.
2. Limpie las
acumula-
ciones de
alquitrán con
aceite com-
bustible
kerosén #2 o
con combustible diesel. No permita
que el combustible penetre en el
cilindro del expulsador pues se
puede causar daño. Seque completa-
mente el clavador antes de usarlo.
Servicio Técnico
Si desea hacer alguna pregunta refer-
ente a la reparación u operación de las
clavadoras, sírvase llamar a nuestro
número especial, 1-800-543-6400.
Clavos et Repuestos
Use sola
mente
sujetadores Campbell Hausfeld origi-
nales (o su equivalente) - (vea la infor-
mación sobre intercambio de sujeta-
dores). Use solamente partes de
repuesto Campbell Hausfeld originales.
Nunca substituya las partes. No use
partes modificadas o partes que no den
un rendimiento equivalente al equipo
original. El rendimiento de las her-
ramientas, la seguridad y la duración
pueden verse reducidos. Cuando
ordene partes de repuesto o sujeta-
dores, especifique el número de la
parte.
Para reparar la clavadora
Las reparaciones de la clavadora las
debe hacer SOLAMENTE un técnico cal-
ificado que tenga experiencia.
Para colocarle los sellos
Cada vez que repare una clavadora
deberá limpiarle y lubricarle las partes
internas. Le recomendamos que use
Parker O-lube o un lubricante equiva-
lente en todos los anillos en O. A cada
anillo en O se le debe dar un baño de
lubricante para anillos antes de insta-
larlos. Igualmente, deberá ponerle un
poco de aceite a todas las piezas que se
mueven y muñones. Finalmente,
después de haberla ensamblado y antes
de probar la herramienta deberá pon-
erle unas cuantas gotas de aceite sin
detergente 30W u otro aceite similar,
en las líneas de aire.
Modelo RN164500
5-Sp
Manual de Instrucciones
OIL DAILY
Oxygen
Oxygen
Nitrogen
Nitrogen
Hydrogen
Hydrogen
Carbon Dioxide
C
arbo
n
D
io
xi
de
OIL DAILY
Oxygen
Nitrogen
Hydrogen
Carbon Dioxide
OIL DAILY
Oxygen
Oxygen
Nitrogen
Nitrogen
Hydrogen
Hydrogen
Carbon Dioxide
Carbon Dioxide
Oxygen
Nitrogen
Hydrogen
Carbon Dioxide
SHINGLE EXPOSURE
OIL DAILY
Oxygen
Nitrogen
Hydrogen
Carbon Dioxide
Movement
O
I
L
D
A
I
L
Y
O
I
L
D
A
I
L
Y
O
x
y
g
e
n
O
x
y
g
e
n
N
i
t
r
o
g
e
n
N
i
t
r
o
g
e
n
H
y
d
r
o
g
e
n
H
y
d
r
o
g
e
n
C
a
r
b
o
n
D
i
o
x
i
d
e
C
a
r
b
o
n
D
i
o
x
i
d
e
1.
2.
OIL DAILY
Oxyg
en
Oxyg
e
n
Nitr
ogen
Nitro
gen
Hydr
o
gen
Hy
d
r
o
g
en
Carbo
n Dioxi
de
Car
bo
n
Dio
x
id
e
OIL DAILY
Oxyg
en
O
xyg
en
Nitrogen
Nitrogen
Hydrogen
Hy
drogen
Carbon Dioxide
C
arb
on
Di
oxi
de
1.
2.
Información de intercambio
Los clavos usados con la clavadora para acabado RN164500 de Campbell Hausfeld también se pueden usar con las clavadoras
Rollo de techado ATRO, Bostitch RN45, N12B, Hitachi NV45AB, Porter Cable RN175, Sears 18324 y Senco SCN200R.
OIL DAILY
Oxygen
Nitrogen
Nitrogen
Hydrogen
Hydrogen
Carbon Dioxide
Carbon Dioxide
OIL DAILY
Ox
ygen
Oxygen
Nitrogen
Nitrogen
Hydrogen
Hyd
rogen
Ca
rbon Dioxide
Carbon
D
io
xide
Oxygen
Oxygen
Nitrogen
Hydrogen
Hydrogen
Carbon Dioxide
Carbon Dioxide
SHINGLE EXPOSURE
Exposición para la teja
Operation (Continued)
OIL DAILY
Oxygen
Oxy
g
en
Nitrogen
Nit
ro
gen
Hydrogen
H
yd
ro
g
e
n
Carbon
Dioxide
Ca
rbon
Diox
id
e
OIL DAILY
Oxygen
Oxygen
Nitrogen
Nitrogen
Hydrogen
Hydrogen
Carbon Dioxide
Carbon Dioxide
OIL DAILY
Oxygen
Nitrogen
Nitrogen
Hydrogen
Hydrogen
Carbon Dioxide
Carbon Dioxide
Funcionamiento
(continuacion)