


31 Sp
Modelo WS0970
Instrucciones para Soldar (Continuación)
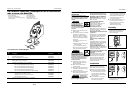
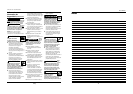
LONGITUD DEL ARCO
Esta es la distancia entre la pieza de
trabajo y el extremo del electrodo, la
distancia que el arco se debe desplazar.
Para generar el calor necesario para
soldar es esencial obtener la longitud
adecuada del arco (Vea la Figura 9). Si
el arco es demasiado largo se produce
un arco inestable, se reduce la penetra-
ción, aumenta el salpiqueo, y los
rebordes son planos y anchos. Si el arco
es demasiado corto no se produce
suficiente calor para derretir la pieza de
trabajo, el electrodo tiene la tendencia
a pegarse, la penetración no es la
adecuada y rebordes son disparejos e
irregulares. La longitud del arco no
debe ser mayor al diámetro de la vara.
Al soldar debe escuchar un sonido
similar al que se produce al freir
tocineta.
VELOCIDAD DE DESPLAZAMIENTO
Es la velocidad con que se desplaza el
electrodo por el área que va a soldar
(Vea la Figura 9). Si la velocidad es
demasiado rápida, el reborde es
angosto y las ondas puntiagudas como
se muestra en la figura. Si la velocidad
es muy lenta, el metal soldado se
acumula y el reborde es alto y ancho.
Para controlar esta velocidad, observe
el grosor del reborde (no el arco)
mientras esté soldando. El reborde es la
franja anaranjada de metal derretido
que se forma al pasar el arco. Su grosor
debe ser aproximadamente el doble de
diámetro del electrodo. Controle la
velocidad de desplazamiento para
obtener un reborde parejo.
SLIMPIEZA DE ESCORIAS
Use ante-
ojos de
seguridad aprobados por la asociación
norteamericana ANSI (ANSI Standard
Z87.1) (o alguna organización similar en
sus respectivos países) y ropa de
protección para sacar la escoria. Los
residuos calientes le podrían ocasionar
heridas a las personas que se
encuentren en el área de trabajo.
!
ADVERTENCIA
Una vez que haya terminado de soldar,
espere a que las piezas soldadas se
enfríen. Una capa protectora que
llamaremos escoria cubre el reborde
para evitar que los contaminanates en
el aire reacionen con el metal
derretido. Cuando el metal se haya
enfriado un poco y no esté al rojo vivo,
podrá limpiar el escoria. Ésto lo puede
hacer con un martillo. Golpee
suavemente la escoria con el martillo
hasta que logre despegarla.
Finalmente, use un cepillo de alambre
para terminar de limpiar. Cuando se
hacen varias pasadas de soldar, quite la
escoria entre una pasada y la siguiente.
POSICIONES PARA SOLDAR
Básicamente hay 4 posiciones para
soldar: plana, horizontal, vertical y por
encima de la cabeza. Soldar en la
posición plana es lo más fácil ya que la
velocidad es mayor, el metal derretido
se chorrea menos, se puede lograr una
mayor penetración y el trabajador se
cansa menos.
Otras posiciones requieren técnicas
diferentes tales como paso entretejido,
circular o cruzado. Para completar este
tipo de soldadura se requiere más
experiencia en la materia.
Siempre debe tratar de soldar en una
posición plana. Para obtener
instrucciones especificas para algún tipo
de soldadura consulte un libro de
referencias para soldadores.
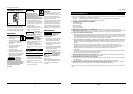
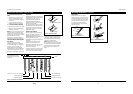
PASOS
Algunas veces deberá usar más de un
paso para soldar. Primero deberá hacer
un paso primordial, éste será seguido
por pasos adicionales de relleno (vea la
Figura 10). Si las piezas son gruesas, tal
vez sea necesario biselar los bordes que
están unidos en un ángulo de 60º .
Recuerde quitar la escoria entre cada
pasada.
Figura 11 - Pasos múltiples
Figura 10 - Pasos
Cubierta
Relleno
Raíz
6
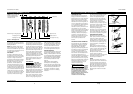
Shielded Metal Arc Welder
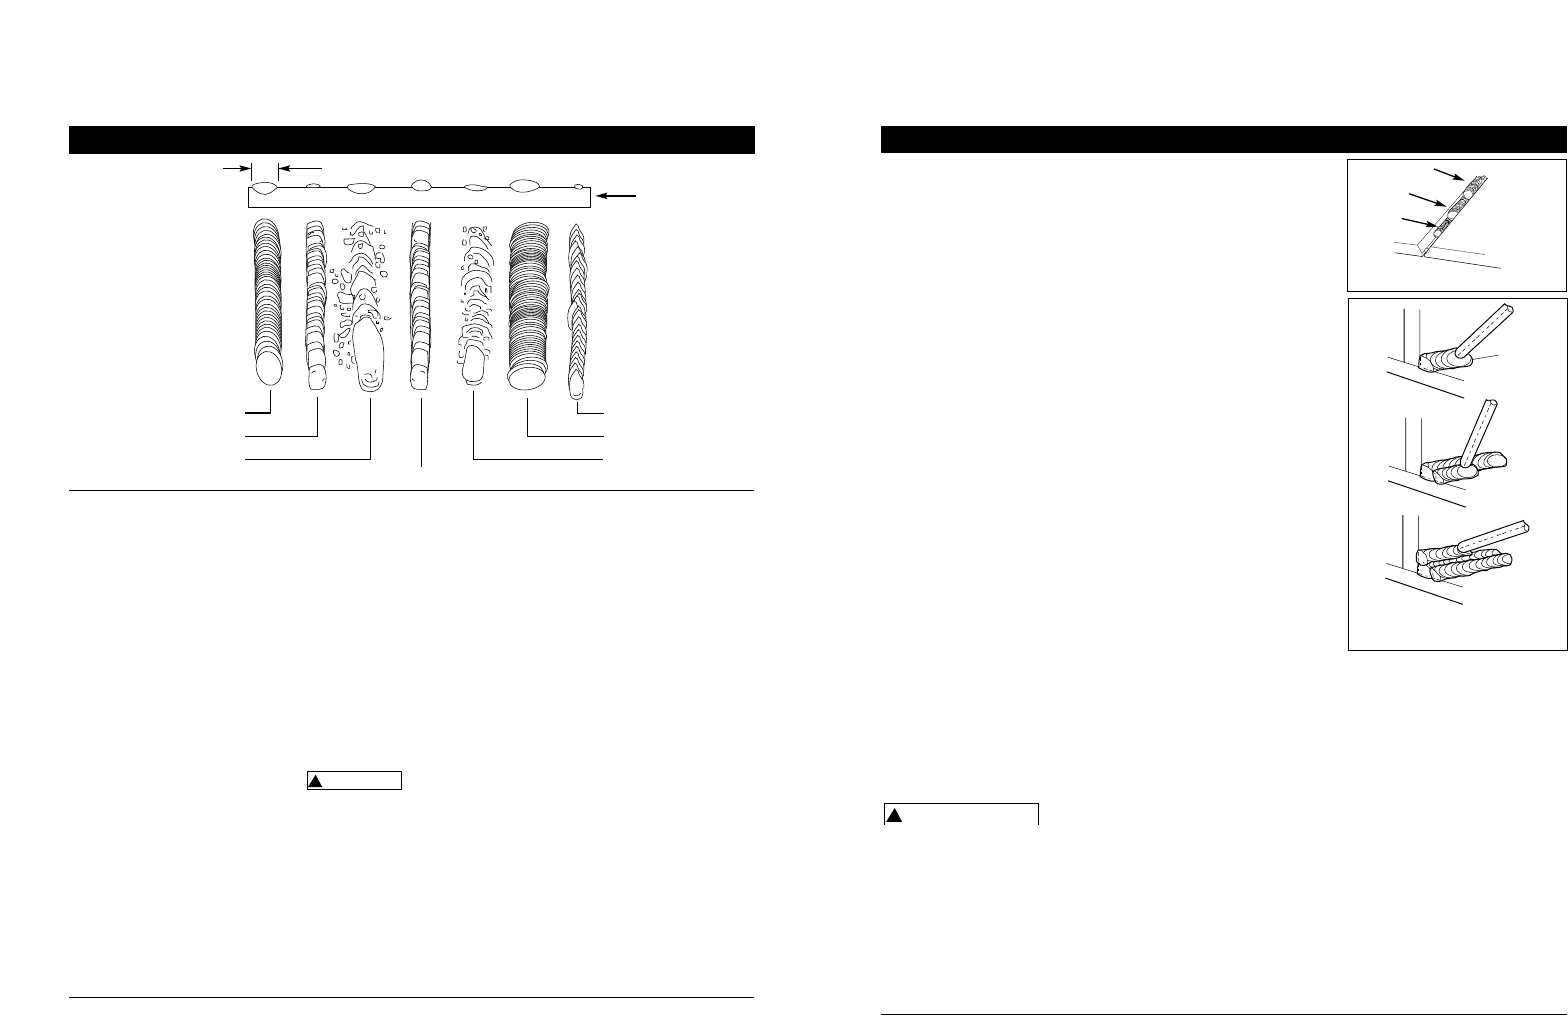
For most applications, a 45º travel
angle and 45º work angle is sufficient.
For specific applications, consult an arc
welding handbook.
NOTE: Right handed welders should
weld from left to right. Left handed
welders should weld from right to left.
The electrode should always point into
the weld puddle as shown.
ARC LENGTH
Arc length is the distance from the
work piece to the tip of the electrode,
the distance which the arc must travel.
A proper arc length is essential to
generate the heat needed for welding
(See Figure 9). An arc that is too long
produces an unstable arc, reduces
penetration, increases spatter, and
causes flat and wide beads. Too short
an arc does not create enough heat to
melt the work piece, the electrode has
a tendency to stick, penetration will be
poor, and uneven beads with irregular
ripples result. A proper arc should be
no longer than the diameter of the rod.
The sound of a proper arc is a steady,
crisp sizzle, similar to bacon frying.
TRAVEL SPEED
The travel speed is the rate at which
the electrode is moved across the weld
area (See Figure 9). When the speed is
too fast, the bead is narrow and bead
ripples are pointed as shown. When the
speed is too slow, the weld metal piles
up and the bead is high and wide. To
control travel speed, watch the width
of the weld bead (not the arc) when
welding. The weld bead is the orange,
molten metal behind the arc. The width
should be approximately twice the
diameter of the welding rod. Control
travel speed to obtain a consistent
bead width.
SLAG REMOVAL
Wear ANSI
approved safety
glasses (ANSI Standard Z87.1) and
protective clothing when removing
slag. Hot, flying debris can cause
personal injury to anyone in the area.
After completing the weld, wait for the
welded sections to cool. A protective
coating called slag now covers the weld
bead which prevents contaminants in
the air from reacting with the molten
metal. Once the weld cools to the point
that it is no longer glowing red, the
!
WARNING
slag can be removed. Removal is done
with a chipping hammer. Lightly tap
the slag with the hammer and break it
loose from the weld bead. The final
clean-up is done with a wire brush.
When making multiple weld passes,
remove the slag between each pass.
WELDING POSITIONS
Four basic welding positions can be used;
flat, horizontal, vertical, and overhead.
Welding in the flat position is easier than
any of the others because welding speed
can be increased, the molten metal has
less tendency to run, better penetration
can be achieved, and the work is less
fatiguing.
Other positions require different
techniques such as a weaving pass,
circular pass, and jogging. A higher skill
level is required to complete these welds.
All work should be performed in the
flat position if possible. For specific
applications, consult an arc welding
handbook.
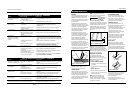
Welding Guidelines (Continued)
Normal Amps, Arc Length, Speed
Amperage Too Low
Amperage Too High
Arc Length Too Short
Arc Length Too Long
Speed Too Slow
Speed Too Fast
Workpiece
NOTE: Weld bead width (W)
should be approximately
twice the diameter fo the
electrode rod used.
W
Figure 9 - Weld Appearance
www.chpower.com