


10
www.chpower.com
Operating Instructions and Parts Manual
WS4369 and WS4469
Maintenance
Disconnect power
supply and turn
machine off before inspecting or
servicing any components.
BEFORE EVERY USE:
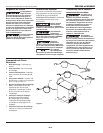
1. Check condition of weld cables and
immediately repair or replace any
cables with damaged insulation.
2. Check condition of power cord and
immediately repair or replace any
cord if damaged.
EVERY 3 MONTHS:
Replace any unreadable labels on the
welder. Use compressed air to blow
all dust and lint from the ventilation
openings.
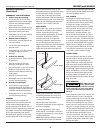
3. Check condition of electrode holder
insulating pieces and immediately
replace cracked or missing
insulators. Verify that all fasteners
are tight and insulated.
Do not operate this
welding machine
with cracked or missing insulation on
welding cables, electrode holder, or
power cord.
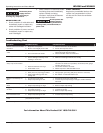
Troubleshooting Chart
Symptom Possible Cause(s) Corrective Action
Welder does not hum when
turned on
1. No power at receptacle
2. Broken or damaged power cable
1. Check circuit fuse or circuit breaker
2. Power cable requires service
Welder hums but does not
weld
1. Inadequate current at electrode
2. Poor connections at welder
1. Check ground clamp, cable and connection to work piece.
Check electrode cable and clamp.
2. Check all welder external connections
Welder gives trickle shocks 1. Accidental contact with work piece
2. Current leakage caused by moist
clothing or work area
1. Avoid contact with work piece
2. Make sure clothing and work area are dry
Welder overheats - blows
fuses, trips circuit breaker
1. Use of extension cord
2. Electrode diameter too large
3. Overloaded circuit
1. If possible, relocated welder to avoid use of extension cord. If
relocation of welder is not possible, use thicker (lower gauge
number) extension cord
2. Use smaller diameter electrode
3. Welder requires a dedicated 230v circuit
Arc difficult to strike 1. Electrode diameter too large
2. Work piece not properly grounded
3. Heavy loads making power line
voltage low
1. Use smaller diameter electrode
2. Verify proper grounding. (No paint, varnish or corrosion)
3. Run welder on dedicated 230v circuit
Bead is intermittently too
thin
1. Inconsistent travel speed
2. Output amp setting too low
1. Decrease and maintain travel speed
2. Increase output amp setting or change to smaller diameter
electrode
Bead is intermittently too
thick
1. Slow and/or inconsistent travel speed
2. Output amp setting too high
1. Increase and maintain travel speed
2. Reduce output amp setting
Ragged depressions at edge
of weld
1. Travel speed too fast
2. Arc length too short
3. Output amp setting too high
1. Decrease travel speed
2. Increase arc length
3. Reduce output amp setting
Weld bead does not
penetrate base metal
1. Inconsistent travel speed
2. Output amp setting too low
1. Decrease and maintain constant travel speed
2. Increase output amp setting
Electrode sticks to work
piece
Electrode is held in contact with work
piece while arc is struck
Lift electrode to correct arc length as soon as arc is struck
Electrodes sputter and stick Damp electrodes Use dry electrodes and store in dry location
For Information About This Product Call 1-800-746-5641