


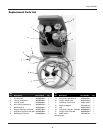

6
Portable Oxy-Fuel Welding and Cutting Outfit
Set-Up (Cont.)
CHECKING FOR LEAKS
Inspect the system for leaks before every
use as follows:
1. With system purged, close both gas
cylinder valves.
2. Turn both regulator adjusting screws
counter-clockwise to stop gas flow.
3. If the high pressure gauge reading
drops, there is a leak in the cylinder
valve, inlet fitting, or high pressure
gauge. If the low pressure gauge
drops, there is a leak in the torch
handle valve, hose, hose fitting,
outlet fitting or low pressure gauge.
4. Use an approved leak detector
solution to check for leaks. If the high
pressure gauge drops, and at the
same time the low pressure gauge
rises, there is a leak in the regulator
seat. Have a qualified technician
repair the regulator.
Operation
Lighting Torch
The following
instructions are for
acetylene gas use only. Contact your gas
supplier for instructions on the use of
other fuel gases.
Before lighting
the torch, follow all
personal and equipment safety
regulations. Wear filtered protective
eyewear (shade 5 minimum) to protect
the eyes from heat, sparks and hazardous
rays of light produced by the flame. Keep
work area well ventilated.
BACKFIRE AND FLASHBACK
When the flame goes out with a loud
pop, it is called a backfire. Backfire can
be caused by (1) operating the torch at
lower pressures than required for the tip
used, (2) touching the tip against the
work, (3) overheating tip, or (4) an
obstruction in the tip. If backfire occurs,
shut off the torch handle valves (oxygen
first) and after remedying the cause,
relight the torch.
A flashback is a condition that results
when the flame flashes back into the
torch and burns inside with a shrill
!
WARNING
NOTICE
hissing or squealing noise. If flashback
occurs, close the torch handle valves
(oxygen first), IMMEDIATELY. Flashback
generally indicates a problem that
should be fixed. A clogged tip, improper
functioning of the valves, or incorrect
acetylene/oxygen pressure could lead to
flashback. Be certain to find the cause
before relighting the torch.
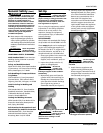
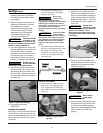
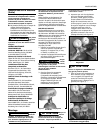
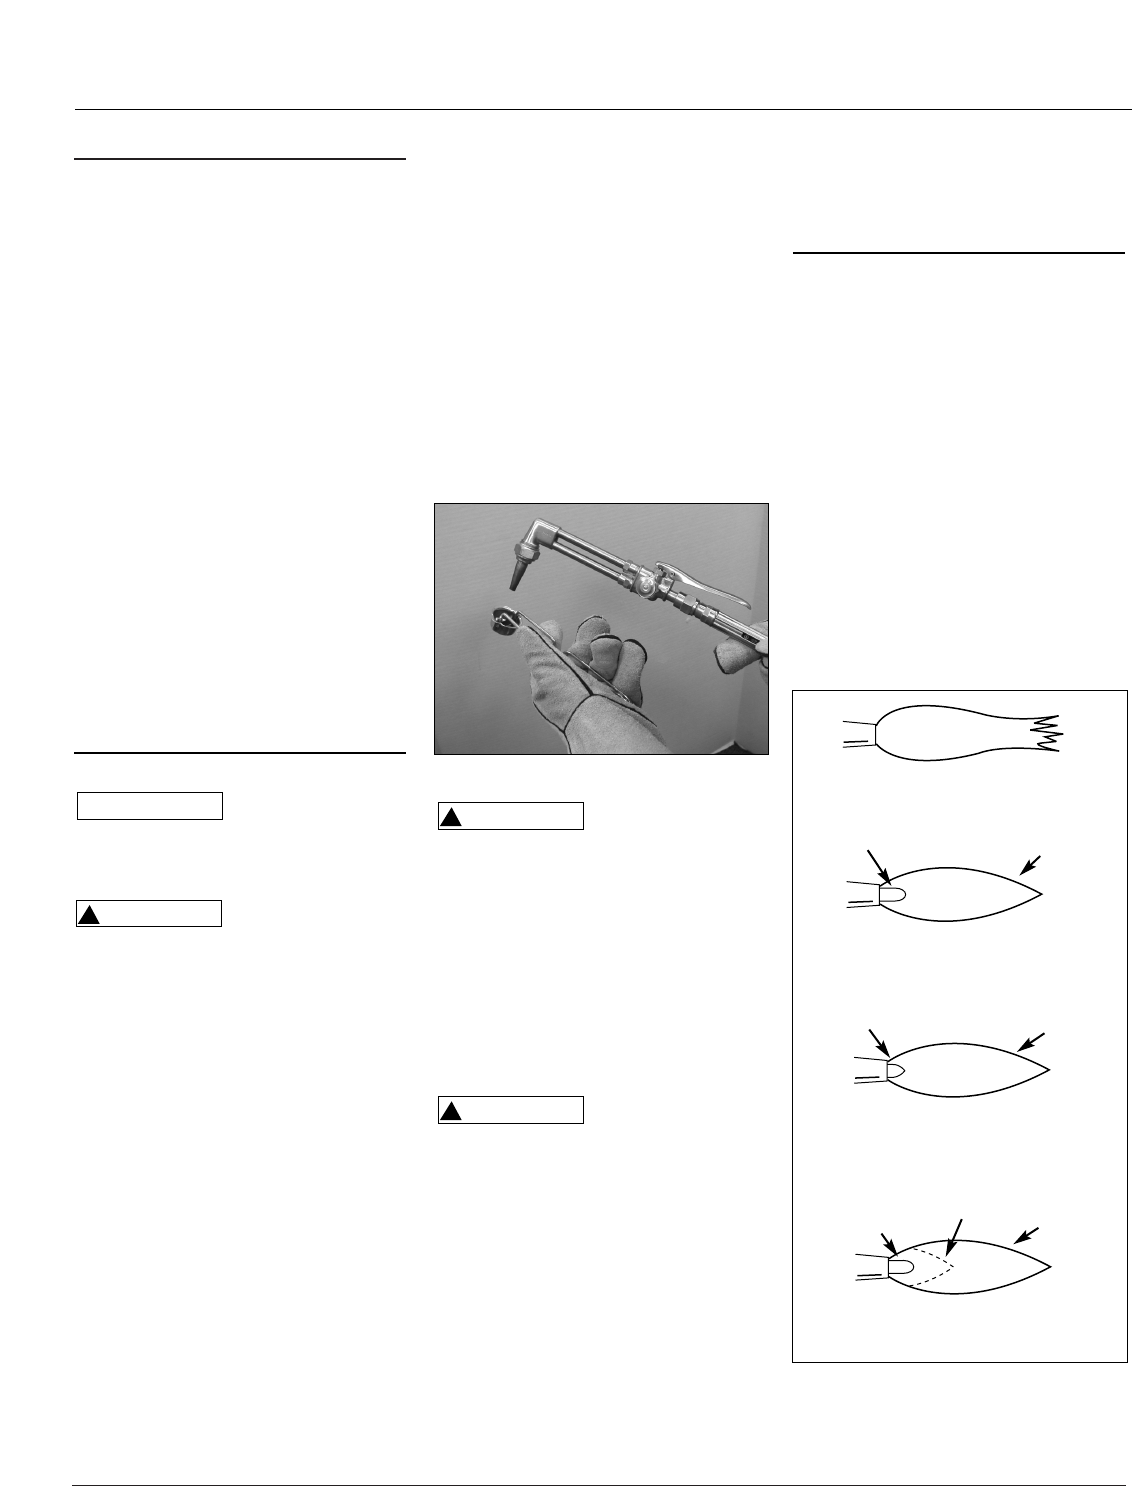
1. Open torch fuel valve one quarter
turn. Click spark lighter in front of
torch tip to ignite the fuel gas. Point
the flame away from persons,
cylinders, or other flammable
materials (see Figure 14).
Never use matches
to start torch as
initial puff of flame may burn hands.
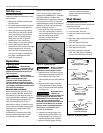
2. Adjust the torch fuel valve until the
flame stops smoking and leaves the
end of the tip about 1/8”, then
reduce slightly to bring flame back to
tip.
3. Open the torch oxygen valve (for
cutting attachment, open preheat
valve ) until a neutral flame appears
(see Figure 15).
If you experience
a backfire or
flashback (a hissing sound caused by the
flame burning inside the mixer area),
IMMEDIATELY turn off the oxygen torch
valve. Then turn off the fuel valve.
Follow shut down procedures and allow
the torch to cool before use. If trouble
persists, contact a qualified technician.
ADDITIONAL ADJUSTMENTS FOR
CUTTING ATTACHMENT:
4. Depress the cutting oxygen lever.
Note that the preheat flame may
change slightly from neutral to a
carburizing flame with a feather.
5. With the cutting oxygen flowing,
!
WARNING
!
WARNING
continue to adjust the preheat
oxygen until the preheat flame is
neutral again.
Shut Down
It is important to follow these
instructions exactly as shown to prevent
equipment damage.
1. Close the torch oxygen valve.
2. Close the torch fuel valve.
3. Close the cylinder valves to both
gasses.
4. Open the oxygen torch valve to bleed
off all oxygen.
5. Close the oxygen torch valve.
6. Open the fuel torch valve to bleed.
7. Close the fuel torch valve.
8. All pressure gauges should read
0 PSI. Turn both pressure adjusting
screws counter-clockwise (no flow).
www.chpower.com
Figure 14 - Igniting fuel gas
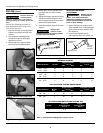
PURE ACETYLENE FLAME
Nearly Colorless
Inner Cone
CORRECT NEUTRAL FLAME
One-to-one mixture of gases
OXIDIZING FLAME
Too much oxygen
CARBURIZING FLAME
Too much acetylene
Bluish to Orange
White
Acetylene
Feather
Inner Cone White
Inner Cone White
Nearly
Colorless
Bluish to
Orange
Light
Orange
Figure 15 - Acetylene Flames