


Page 14SKU 41213 For technical questions, please call 1-800-444-3353.
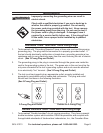
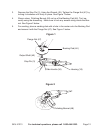
15 to 25 Degrees
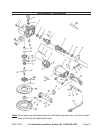
To start, grip the Polisher rmly with both hands and press in on the ON/OFF
Switch (24). Press the Lock-ON Button (22) to lock the Switch in the ON posi-
tion. Press the ON/OFF Switch (24) in again to unlock it.
Position the unit on the area to be polished. Keep pressure off of the Polisher/
Sander when operating. The Polishing Bonnet should LIGHTLY contact the pol-
ishing surface.
Begin applying wax to the vehicle. Apply the wax to all at surfaces with broad,
sweeping strokes in a crisscross pattern. Apply the wax evenly over the surface
of the vehicle, and add additional wax as needed.
After the wax has been applied to the vehicle’s surface, release the Switch (24)
to its OFF position. Then unplug the Power Cord (33) from the electrical exten-
sion cord. Remove the Polishing Bonnet (48) from the Backing Pad (46).
Using a soft terry cloth, apply the wax by hand to all hard to reach areas of the
vehicle such as around lights, door handles, under bumpers, etc. Allow sufcient
time for the wax to dry on the vehicle.
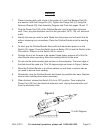
Place a clean Polishing Bonnet (48) securely onto the Backing Pad (46).
Note: Always tightly pull the string to secure the Polishing Bonnet. Secure the
string and keep it out of the way by tying several knots.
Plug the Power Cord (33) of the Polisher into the electrical extension cord.
Note: Always start and stop the Polisher while it is held rmly against the sur-
face of the vehicle. Failure to do so may result in the Polishing Bonnet (48) being
thrown from the Backing Pad (46).
Grip the Polisher rmly with both hands and press in on the ON/OFF Switch (24).
Press the Switch Lock-on Button (22) to lock the Switch in the On position. Press
in on the Switch (24) to unlock it.
Begin polishing the vehicle by lightly bufng off the wax residue in a circular
pattern. Continue polishing until all the wax residue is removed. Use a soft terry
cloth to remove any wax still left on vehicle in hard to reach areas by hand.
When nished, release the Switch (24) to its OFF position. Then unplug the
Power Cord (33) from the electrical extension cord. Unplug the extension cord
from the electrical outlet. Store in a dry area.
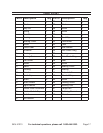
4.
5.
6.
7.
8.
9.
10.
11.
12.
13.