


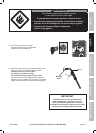

Page 17For technical questions, please call 1-800-444-3353.SKU 68885
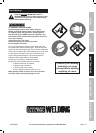
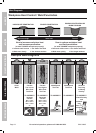
Avoid damage to the Welder by not welding
for more than the prescribed duty cycle time.
The Duty Cycle defines the number of minutes,
within a 10 minute period, during which a given
welder can produce a particular welding current
without overheating. For example, this Welder
with a 20% duty cycle at rated output (110A)
must be allowed to rest for at least 8 minutes
after every 2 minutes of continuous welding.
Failure to carefully observe any duty cycle limitations
can easily over-stress a welder’s power generation
system contributing to premature welder failure.
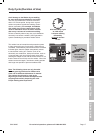
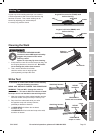
This welder has an internal thermal protection system
to help prevent this sort of over-stress. When the unit
overheats, it automatically shuts down and the Overload
Indicator lights, then the welder automatically returns
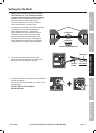
to service after cooling off. Rest the Torch on an
electrically non-conductive, heat-proof surface, such as
a concrete slab, well clear of the ground clamp while
allowing the welder to cool with the Power Switch on, so
that the internal Fan will help cool the welder. When the
welder can be used again, use shorter welding periods
and longer rest periods to prevent needless wear.
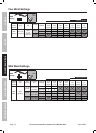
Note: The following charts are only intended
to show general guidelines for different wire
sizes and for different thicknesses of material.
The settings should only be used at the
beginning of a weld and must be adjusted after
stopping and carefully inspecting the weld.
Proper welding takes experience.
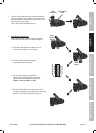
20% Rated Duty Cycle
at 110A output
2 minutes welding
followed by
at least 8 minutes
of rest
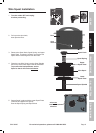
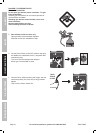
MIG 170
WIRE FEED WELDER
ITEM 68885
WIRE FEED SPEED
20A
240V~
Wire
.023″-.035″
(Tip and roller change required)
Capacity 22 Ga. – 1/4″ Steel Plate
Material
Types
Mild Steel and Stainless Steel
(Not for welding Aluminum.)
I
O
Torch
concrete slab
(or other heat-proof,
non-conductive
surface)
Duty Cycle (Duration of Use)
SAFETYMAINTENANCE BASIC WELDINGWELDING TIPS SETUP