


Page 22 For technical questions, please call 1-800-444-3353. SKU 68885
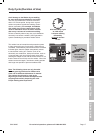
Note: If Welder is used too long, the amber Overload
Indicator will light and the Welder Torch will shut off
until the welder cools. If this happens, rest the Torch
on an electrically non-conductive, heat-resistant
surface, such as a concrete slab, well clear of the
ground clamp. Wait about 8-10 minutes with the Power
Switch ON for the welder to cool. When the welder
can be used again, use shorter welding periods and
longer rest periods to help prevent needless wear.
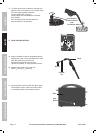
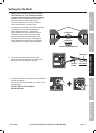
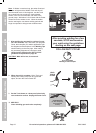
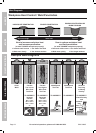
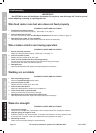
7. After welding the test weld on a piece of scrap
for a few seconds, stop, and check your progress.
Clean, then compare your weld’s appearance with
the diagrams and descriptions in the Welding Tips
section starting on the next page. After making
any necessary adjustments, continue to weld
while carefully following the DUTY CYCLE
guidelines as explained on page 20.
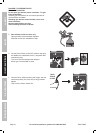
CAUTION! Weld will be hot, do not touch.
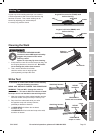
8. When the weld is complete, lift the Torch and
welding wire clearly away from any grounded
object, and turn the Power Switch off.
9. Set the Torch down on a heat-proof, electrically
non-conductive surface. Unplug the Power Cord.
10. MIG ONLY:
Close shielding gas tank valve completely.
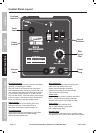
MIG 170
WIRE FEED WELDER
ITEM 68885
WIRE FEED SPEED
20A
240V~
Wire
.023″-.035″
(Tip and roller change required)
Capacity 22 Ga. – 1/4″ Steel Plate
Material
Types
Mild Steel and Stainless Steel
(Not for welding Aluminum.)
I
O
Torch
concrete slab
(or other heat-proof,
non-conductive
surface)
After practice welding for a few
seconds, STOP and examine
your weld using the guidelines
starting on the next page.
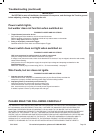
FOLLOW DUTY CYCLE!
up to 2 minutes
welding at rated output
MIG 170
WIRE FEED WELDER
ITEM 68885
WIRE FEED SPEED
20A
240V~
Wire
.023″-.035″
(Tip and roller change required)
Capacity 22 Ga. – 1/4″ Steel Plate
Material
Types
Mild Steel and Stainless Steel
(Not for welding Aluminum.)
I
O
HOLD
TORCH
CLEAR
Torch
concrete slab
(or other heat-proof,
non-conductive
surface)
SAFETY MAINTENANCEBASIC WELDING WELDING TIPSSETUP