


Page 8 For technical questions, please call 1-800-444-3353. SKU 68885
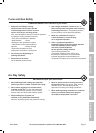
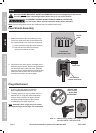
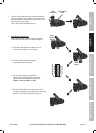
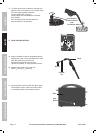
1. Attach the handle to the Face Shield by lining
up the two rectangular tabs on the handle with
the corresponding holes in the face shield and
A. press the tabs through the holes and then
B. slide the tabs forward from the back,
locking the round tab in place.
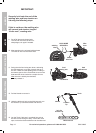
2. Wear heavy-duty work gloves, the edges of the
filter lens may be sharp. Remove any protective
film from both sides of the filter lens. Slide the
filter lens into the helmet behind the holding tabs.
Make sure that the filter lens fits securely and
that light cannot leak around its edges.
Handle
Face Shield
(viewed from front)
AA
BB
Round
Tab
Face Shield
(viewed from back)
Filter Lens
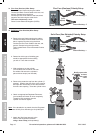
Setup
Read the ENTIRE IMPORTANT SAFETY INFORMATION section at the beginning of this manual
including all text under subheadings therein before set up or use of this product.
TO PREVENT SERIOUS INJURY FROM ACCIDENTAL OPERATION:
Turn the Power Switch off and unplug the welder before assembly.
Note: Remove the protective foam and cardboard from the welder before setup.
Face Shield Assembly
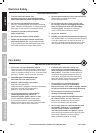
Plug Attachment
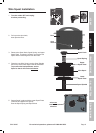
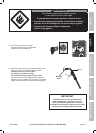
1. A 250 V~ plug will need to be installed
by a certified electrician before use.
2. The plug shown is for use on a 50 A circuit. A
different 250 V~ plug and outlet combination
may be used, provided it is rated to handle
the electrical requirements of the tool and
is installed by a certified electrician.
Note: Although 125 V~ plugs may look similar,
the required plug is much larger, see illustration.
250 V~ 3-Prong Plug (6-50p) and Outlet (6-50r)
(for up to 250 V~ and up to 50 A)
DO NOT USE
125 V~ PLUG.
NOTE SIZE
DIFFERENCE.
SAFETY MAINTENANCEBASIC WELDING WELDING TIPSSETUP