


Page 27For technical questions, please call 1-800-444-3353.SKU 68885
Maintenance
TO PREVENT SERIOUS INJURY,
FIRE AND BURNS:
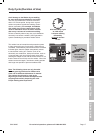
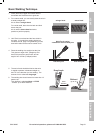
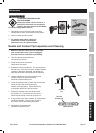
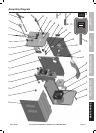
Unplug the welder, rest the Torch on a
heat-proof, electrically non-conductive
surface, and allow all parts of the Welder
to cool thoroughly before service.
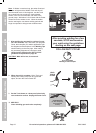
1. Periodically remove the Side Panel, and using
compressed air, blow out all dust from the interior.
2. Store in a clean and dry location.
3. For optimal weld quality, clean and
inspect the Contact Tip and Nozzle
before each use, as explained below:
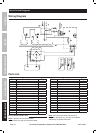
Nozzle and Contact Tip Inspection and Cleaning
1. Make sure that the entire Torch is completely
cool and that the Power Cord is unplugged
from the electrical outlet before proceeding.
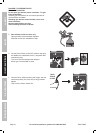
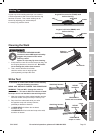
2. Turn the Nozzle counterclockwise
while pulling to remove.
3. Scrub the interior of the Nozzle
clean with a wire brush.
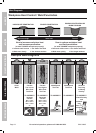
4. Examine the end of the Nozzle. The end should be
flat and even. If the end is uneven, chipped, melted,
cracked, or otherwise damaged, the Nozzle will
adversely effect the weld and should be replaced.
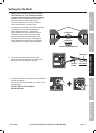
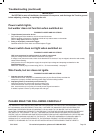
5. Using the third oval hole on the Multi-wrench,
turn the Contact Tip counterclockwise
and slide it off the welding wire.
6. Scrub the outside of the Tip clean with a wire brush.
Clean out the inside of the tip with a tip
cleaner (sold separately). Check that the Tip
is the proper type for the wire size used.
7. Examine the shape of the hole at the end of
the Contact Tip. It should be an even circle, it
should not be oblong or have any bulges in it.
8. If any problems are noted, Contact Tip replacement
would be advisable. Select a new Tip that is
the correct size for the welding wire used.
9. Reinstall the Tip and securely
reinstall the Nozzle as well.
Torch
concrete slab
(or other heat-proof,
non-conductive
surface)
+
Multi-wrench
hole for
Contact Tip
Torch
Nozzle
Contact
Tip
SAFETYMAINTENANCE BASIC WELDINGWELDING TIPS SETUP