


Operation of this welder consists of selecting
and adjusting operating controls for optimum
voltage (welding heat) and wire speed settings.
CONTROLS ANDINDICATORS
WARNING
Electric shock can kill! Whenever the
POWER switch is in the ON position, the
welding circuit is activated. Under this
condition, an arc will occur if the welding wire
or any part of the welding circuit comes in
contact with welding ground.
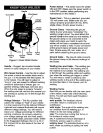
POWER SWITCH - The power switch
supplies electrical current to the welder.
Whenever the power switch is in the ON
position, the welding circuit is activated.
ALWAYS turn the power switch to the OFF
position and unplug the welder before
performing any maintenance.
VOLTAGE SELECTOR; - The voltage selec-
tor controls the welding heat. The voltage
selector is lettered A-D. Letter A is the lowest
heat and letter D the highest. Refer to the
label under the welder hood (or on page 30
of this manual) for recommended heat
settings for your welding job. Position D on
the Voltage Selector produces the rated out-
put of 85 amps.
WIRE SPEED CONTROL - The wire speed
control adjusts the speed at which the wire is
fed out of the welding gun. The wire speed
needs to be closely matched (tuned-in) to
the rate at which it is being melted off. Some
things that affect wire speed selection are
the type and diameter of the wire being
used, the heat setting selected, and the
welding position to be used.
Note: The wire will feed faster without an
arc. When an arc is being drawn, the wire
speed will slow down.
LEARNING TO WELD
MIG (Metal Inert Gas) welding is the process
of uniting metallic parts by heating and
/O
allowing the metals to flow together through
the use of an electrical arc. The electrical arc
is created between a continuous consumable
wire electrode (the welding wire) and the
work piece. An inert shielding gas is used to
protect the weld puddle from contamination
and enhance the welding capabilities of the
electrical arc.
Whether you have welded before or not, it is
important that you become familiar with your
new welder, its controls, and the results
achieved at different settings. We strongly
recommend that you practice with your new
welder on scrap metal trying different heat
settings, base metal thicknesses, and welding
positions for each type and size of wire you
will be using. By doing this you will gain a feel
for how changes in these welding variables
affect the weld.
Of course, if you have not welded before,
you will need to develop welding skills and
techniques as well.
The self-taught welder learns through a
process of trial and error. The best way to
teach yourself how to weld is with short peri-
ods of practice at regular intervals. All prac-
tice welds should be done on scrap metal
that can be discarded. Do not attempt to
make any repairs on valuable equipment
until you have satisfied yourself that your
practice welds are of good appearance and
free of slag or gas inclusions. What you fail
to learn through practice will be learned
through mistakes and re-welds later on.
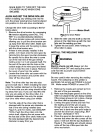
HOLDING THE GUN
The best way to hold the welding gun is the
way that feels most comfortable to you.
While practicing to use your new welder,
experiment holding the gun in different posi-
tions until you find the one that seems to
work best for you. Refer to WELDING POSI-
TIONS- p.18)
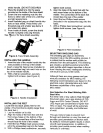
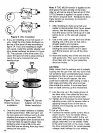
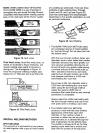
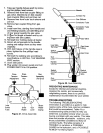
Position the Gun to the Work Piece
There are two angles of the gun nozzle in
relation to the work piece that must be con-
sidered when welding.
1. Angle A (Figure 9) can be varied, but in
most cases the optimum angle will be 60