


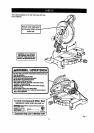
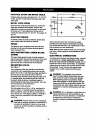

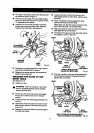

POSITIVE STOPS ON MITER TABLE
Positivestops have been providedat 0°, 15°, 22-1/'Z',
31.62_,and 45° on beththe leftand rightside of the
mitertable.
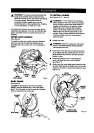
BEVEL LOCK KNOB
The bevel lockknobsecurelylocksyourcompound
mitersaw at desired hovelangles. Positivestop
adjustmentscrewshave been providedon each side
ofthe saw arm. These adjustmentscrewsare for
makingfine adjustmentsat 0° and 45°. Sea pages 18
and 19.
ELECTRIC BRAKE
An electricbrake has been providedto quicklystop
blade rotationafterthe switchisreleased.
FENCE
The fenceon yourcompound miter saw has been
providedto holdyour workpiecesecurelyagainst
when making all cuts.
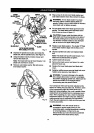
SELF-RETRACTING LOWER BLADE
GUARD
The lowerbladeguard is made ofshock-resistant,
see-throughplasticthat providesprotectionfrom each
side ofthe blade. Itretractsover the upper blade
guardas the saw is lowered intothe workpiece.
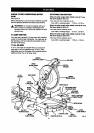
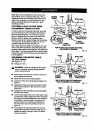
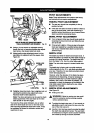
MOUNTING HOLES
See Figure 7.
Your compound mitersaw shouldbe permanently
mountedto a firm supportingsurface suchas work-
bench. Four 7/16 in,boltholeshave been providedin
the saw base forthis purpose.Each of the four
mountingholesshouldbe belted securelyusing7/16
in. machinebolts,lockwashers, and hex nuts(not
included).Beltsshouldbe of sufficientlengthto
accommodatethe saw base, lockwashers,hex nuts,
and the thicknessofthe workbench.
Tightenall four belts securely.
The holepatternfor an 20 in.x 30 in.workbenchis
shownin Figure7. Carefullycheckthe workbench
after mounting to make sure that no movement can
occurduring use. If anytipping,sliding,or walkingis
noted, secure the workbenchto the floorbefore
operating.
_k WARNING: Always make sureyour compound
miter saw is securelymountedto a workbenchor
an approvedworkstand.Failure todo so could
resultin an accident resultingin possibleserious
personal injury.
30in.
21-3/4in.
Fig. 7
Nextto the belt holes,four nail holeshave been
providedinthe saw basefor temporarilymounting
yourcompoundmiter saw. Use 4 nailsabout2-1/2 in.
longto secureyour saw temporarily.
Note: Make sure the surfacewhere you are mounting
yoursaw, isthick enoughto accommodatethe nails
being used.
ELECTRICAL CONNECTION
Your saw has a precisionbuiltelectricmotor. It should
be connected to a power supply that Is 120 volts,
60 Hz, AC only (normal household current). Do not
operatethis toolon directcurrent(DC). A substantial
voltagedropwillcause a lossof power and the motor
willoverheat, ifyourtooldoes not operate when
pluggedintoan outlet,double-checkthe power
supply.
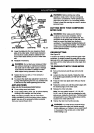
& WARNING: The operationofany saw can
resultin foreignobjectsbeing thrown intoyour
eyes, whichcan resultin severe eye damage.
Beforestartingpowertooloperation,always
wear safely gogglesor safety glasseswithside
shieldsand a fullface shieldwhen needed. We
recommendwide vision safety maskforuseover
eyeglassesor standardsafetyglasses withside
shields,
WARNING: Do net attemptto modifythis toolor
create accessories not recommendedfor use
with this tool. Any suchalteration or modification
is misuseand couldresultin a hazardous
condition leadingto possible serious personal
injury.
12