


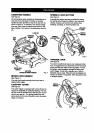
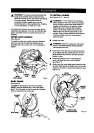

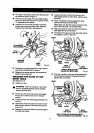


• Using a 6 mm hex key, loosenthe sockethead
screwssecudngthe fence. See Figure 16.Adjust
the fence leftor dghtuntilthe framingsquareand
zero clearance throat plate are parallel.
• Retightenthe screwssecurelyand recheckthe
fence-to-tablealignment.
6 mmSOCKET
HEADSCREWS
6 mmSOCKET
HEADSCREWS
Fig. 16
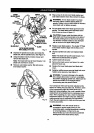
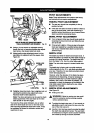
SQUARING THE SAW BLADE TO THE
FENCE
See Figures 17- 20.
• Unplugyoursew.
& WARNING: Failureto unplugyoursew could
result inaccidental startingcausingpossible
seriouspersonalinjury.
• Pullthe sew arm all theway downand engage
the lock pinto holdthe saw arm intransport
position;
Loosen the miter lock handle approximately
one-half turn.
Depress the miter lock plate and rotate the miter
table untilthe pointer on the controlarm is
positioned at 0°.
Release the miterlockplate and securelytighten
the miter lockhandle.
• Laya framing square fiat on the mitertable. Place
one leg ofthe square against the fence. Slidethe
otherleg ofthe square againstthe fiat pert of sew
blade.
Note: Make surethat the square contactsthe fiat
part of the sew blade, not the bladeteeth.
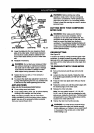
FENCE
FRAMING
SQUARE
MITER BLADE
TABLE MITER
LOCKPLATE
FENCE
MITER
VIEWOFBLADE LOCKHANDLE
SQUAREWITHFENCE Fig. 17
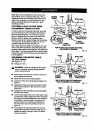
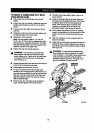
MITER BLADE
TABLE MITER
LOCKPLATE
VIEWOFBLADENOTSQUAREWITH
FENCE,ADJUSTMENTSAREREOUIRED Rg. 18
MITER BLADE
TABLE MITER
LOCKPLATE
VIEWOF BLADENOTSQUAREWITH
FENCE,ADJUSTMENTSARE REQUIRED
Fig. 19
16