


STRAIGHT
CROSSCUT
C-CLAMP
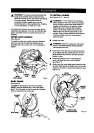
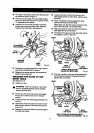
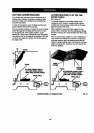
• Slowlylowertheblade intoandthroughthe
workpiece.See Figure26.
•• Release theswitchtriggerand allowthe sew
bladeto stoprotatingbeforeraisingthe bladeout
ofworkpiece.Wait untilthe electricbrake stops
bladefrom fuming before removingthe workpiece
from the mitertable.
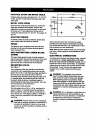
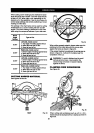
BEVEL CUT
See Figures27 and 28.
A bevel outis made by cuttingacrossthe grain ofthe
workpiecewiththe bladeangled tothe workpieca.A
straightbevelcut ismade withthe mitertable set at
the zero degreepositionand the blade set at an angle
between 0° and 45°,
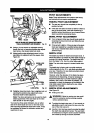
LEFTSIDE RIGHTSIDE
LEFT
INDICATOR/ INDICATOR
POINT t POINT
Fig. 26
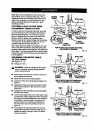
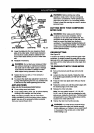
• Placethe workpiecefiat on the mitertable with
one edge securelyagainstthe fence. If the board
iswarped, place the convexside againstthe
fence. If theconcave edge ofa board isplaced
againstthe fence, the board couldcollapse on the
blade at the end ofthe cut,jammingthe blade.
See Figures33 and 34.
• When cuttinglong piecesof lumberor molding,
supportthe oppositeend ofthe stockwith a roller
stand or witha work surfacelevel withthe sew
table.
Aligncuttinglineon the workpiecewith the edge
of sew blade.
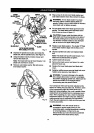
Grasp the stockfirmlywith one handand secure
itagainstthe fence. Use the optionalwork clamp
or a C-clamp tosecure the workpiecewhen
possible.See Figure26.
_k WARNING: To avoidseriouspersonalinjury,
keep yourhandsoutside theno handszone; at
least 3 in.from blade. Never performany cutting
operationfreehand (withoutholdingworkpiece
againstthe fence). The blade couldgrabthe
workpieceif it slipsor twists.
SCALE
MOUNTINGBRACKET SCALE Fig.27
• Beforeturningon the saw, performa dry runofthe
cuttingoperationjust to make surethat no
problemswilloccurwhen thecut ismade.
• Grasp the saw handlefirmly,pressthe lock-offtab
down, then squeeze the switchtrigger.Allow
several secondsfor the blade to reach maximum
speed.
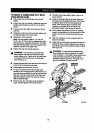
TO BEVEL CUT WITH YOUR MITER
SAW:
• Pulloutthe lock pinand liftsew arm to its full
height.
• Loosenthe miterlockhandle. Rotate the miter
lockhandle approximatelyone-half fum to the left
to loosen.
• Pressthe miterlock plate downwithyourthumb
and hold.
• Rotatethe control arm untilthe pointeralignswith
zero on the miter scale.
• Release the miter lockplate.
Note: You can quicklylocatezero byreleasing
the lockplate as you rotatethe controlarm. The
lockplate willseat itselfin one ofthe built-in
positivestop notches,locatedinthe mitertable
frame.
• Tightenthe miter lockhandle securely.
_k WARNING: To avoidseriouspersonalinjury,
always tightenthe miterlockhandle securely
beforemakinga cut. Failuretodo so could result
in movementofthe controlarm or mitertable
while makinga cut.
20