


_, WARNING: To preventaccidentalstartingthat
couldcause possibleseriouspersonalinjury,
assemble all partsto yoursaw beforeconnecting
itto powersupply.Saw shouldnever be
connectedtopower supplywhen you are
assemblingparts,makingadjustments,installing
or removingblades, or when not in use.
Asmentionedpreviouslyyoursew has been factory
assembled and adjusted.The miterlock handle,dust
guide,and blade are the onlypartsthat haveto be
installed.
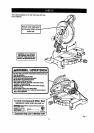
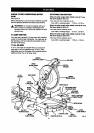
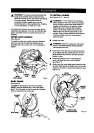
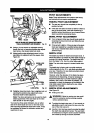
MITER LOCK HANDLE
See Figure 8.
To installthe miter lockhandle,place the threaded
studon the end ofthe miterlockhandle intothe
threaded holeinthe controlarm. Tum clockwiseto
tighten.
TO
LOOSEN
CONTROL MITER
MITER ARM TABLE
LOCKHANDLE Fig. 8
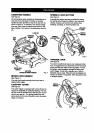
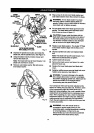
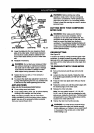
DUST GUIDE
Sea Figure 9.
To installthe dust guide,place the end marked
INSERT over the exhaustport in the upper blade
guard.Tum the guide sothat the open end isfacing
downor towardthe rear ofthe saw.
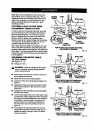
TO INSTALL BLADE
See Figures 10, 11, and 12.
WARNING: A 12 in. bladeisthe maximum
blade capacity ofyoursaw. Never usea blade
that istoothickto allowouterblade washerto
engage withthe flatson the spindle.Larger
bladeswillcome in contact with the blade
guards,whilethicker blades willpreventthe
blade screwfrom secudngthe blade onthe
spindle.Eitherof these situationscould resultin
a sedousaccidentand cancause serious
personalinjury.
• Unplugyoursew.
& WARNING: Failuretounplugyoursaw could
resultinaccidentalstartingcausingpossible
sedouspersonal injury.
Push downon the sew arm and pullout the lock
[)into release saw arm. Raise sew armto itsfull
raisedposition.Be cautious, sew arm is spring
loadedto raise.
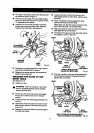
• Loosenthe phillipsscrew on the blade bolt
cover untilbladeboltcover can be raised.
See Figure 10.
• Gently raisethe lowerblade guard bracketsothat
the lowerbladeguard and blade belt cover can be
rotatedup and backto expose the bladebelt. See
Figures10.
LOWER
BLADEGUARD
PHILUPS
SCREW
EXHAUST
PORT
BLADE
BOLT
DUSTGUIDE
ILADE
GUARDBRACKET Fig.10
Fig. 9
13