


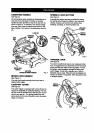
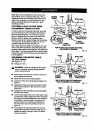


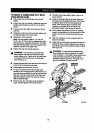


DEPTHSTOP
ADJUSTMENT
BEVEL
LOCKKNOB
MITER
PosmvE TABLE
STOPADJUSmENTLOCKNUT(S) Fig.25
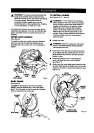
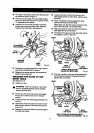
• Lowerthebladeintothezeroclearancethroat
plataofthe miter table. Check blade clearance
and maximum cuttingdistance(distancefrom
fence where blade enters) tofront of mitertable
sloL
• Readjustif necessary.
WARNING: Do not startyourcompoundmiter
saw withoutcheckingfor interferencebetween
the blade and the mitertable support.Damage
couldresulttothe bladeif itstrikesthe miter
table supportduringoperationofthe saw.
• Tightenthe hex nutwith a 17 mm wrenchor
adjustablewrench.
• To preventthe depthstopadjustmentscrewfrom
tuming whiletighteningthehex nut,carefully held
itwiththe hex key whiletighteningthe hex nut.
APPLICATIONS
(Use only for the purposes limed below)
• Crosscuttingwood and plastic.
• Crosscuttingmiters,joints,etc. for pictureframes,
moldings, doorcasings, and fine joinery.
Note: The blade providedisfine for mostwood
cuttingoperations,butforfine joinerycutsor cutting
plastic,usa one ofthe accessoryblades available
fromyour nearestSears store.
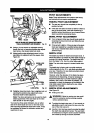
& WARNING: Beforestartinganycutting
operation,clamp,boltor nailyour compound
mitersaw to a workbench.Never operateyour
miter saw on the flooror ina crouchedposition.
Failureto heed this waming can resultinsorious
personalinjury.
cu'n'ING WITH YOUR COMPOUND
MITER SAW
&
WARNING: When usinga workclamp or
C-clampto secure your workpiece,clamp
workpieceon one side ofthe blade only. The
workpiecemustremainfree on one side ofthe
blade topreventthe bladefrom bindingin
workpiece.The workpiecebindingthe blade will
cause motor stallingand kickback.This situation
couldcause an accidentresultingin possible
serious personal injury.
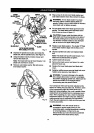
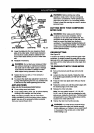
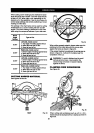
CROSSCUTTING
See Figure26.
A crosscutismade bycuttingacross the grainofthe
workpiece.A straightcrosscutismade withthe miter
table set at the zero degree position. Mitercrosscuts
are made with the mitertable set st some angleother
than zero.
TO CROSSCUT WITH YOUR MITER
SAW:
• Pulloutthe lock pinand liftsaw armto itsfull
height.
• Loosenthe miterlock handle. Rotatethe miter
lockhandle approximately one-haftturntothe left
toloosen.
• Pressthe miter lockplate downwithyour thumb
and held.
• Rotate the control arm untilthe pointer alignswith
the desired angleon the miterscale.
• Release the miterlockplate.
Note: You canquicklylocate0°, 15°, 22-1/2°,
31.62°, and 45° leftor rightbyreleasingthe lock
plate as you rotate the controlarm. The lockplate
willseat itselfin one ofthe positive stopnotches,
locatedin the mitertable frame,
• Tightenthe miterlock handle securely.
,_ WARNING: To avoidseriouspersonal injury,
alwaystightenthe miter lockhandle securely
before makinga cut. Failureto do so could result
in movement ofthe controlarmor mitertable
whilemakinga cut.
19