


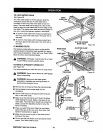


TO MAKE NON-THROUGH CUTS
Non-through cuts can be made withthe grain (ripping)
or across the grain (crosscut). The use of a non-
through cut is essential to cutting grooves, rabbets,
and dadoes. This is the only type cut that is made
without the blade guard installed. Make sure the blade
guard assembly is reinstalled upon completionof this
type of cut. Read the appropriate section which
describes the type of cut in addition to this section on
non-through or dado cuts. For example, if your non-
through cut is a straight cross cut, read and under-
stand the section on straight cross cuts before pro-
ceeding.
_ Z
_, INARNING: Unplug the saw to avoid possible
mlury.
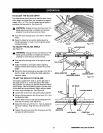
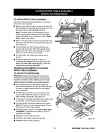
• Remove the three screws holding the throat plate
inplace, Remove the throat plate.
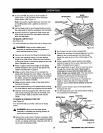
• Raise the saw blade bypushing the bevel locking
lever to the left and rotatingthe blade adjusting
handle clockwise.
• Put the saw in Angle mode by pushing the bevel
locking lever to the right. Turn the blade adjusting
handle until the blade indicator shows a 30 degree
angle. Push the bevel locking lever securely to the
left to lock the angle.
• With the box end of the small hex wrench, loosen
the two hex nuts at the base of the riving knife.
Do not remove hex nuts. Remove the riving
knife/guard assembly. Retighten the two hex nuts
on the base. Insert the throat plate.
• Bring the blade back to 90 degrees.
• Lower the blade to the correct height by turning the
blade adjusting handle counterclockwise. Secure
throat plate with the three screws.
_t, WARNING: Carefully check all setups and
rotate the blade one full revolution to assure
proper clearance before connecting saw to
power source.
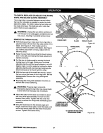
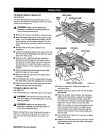
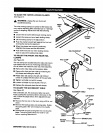
• Always use push blocks, push sticks, and
featherbeards when making non-through cuts to
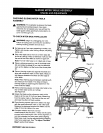
avoid the risk of serious injury.See Figure 47.
PUSH STICK
"C" CLAMP PUSHBLOCK BEVELLOCKINGLEVER
Figure 47
_. WARNING: Never feed wood with your hands
i
when making any non-through cut such as
rabbets or dadoes.
• When the cut is complete, unplug saw and raise
the blade.
• Remove the three screws holding the throat plate
in place. Remove the throat plate.
• Push the bevel locking lever to the right. Rotate the
blade adjusting handle until the bevel indicator
shows a 30 degree angle. Push the bevel locking
lever securely to the left while holding the blade
adjusting handle to lock the angle. Reinstall the
blade guard assembly.
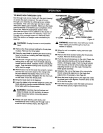
• Retighten the nuts at the base of the riving knife.
Check riving knife alignment to the blade and
adjust shims if necessary. See Page 20.
• Move the bevel locking lever to the right and rotate
the blade back to 90 degrees. Push the lever to the
left to lock the angle.
• Insert the throat plate, lower the blade and secure
with the three screws. Tighten them firmly.
CRRFTSMlUI" TABLE SAW 315.228110 32