


LOW BATTERY CAPACITY iNDiCATOR
• If the LED begins to rapidly flash when the trigger switch is depressed, the
battery pack's power has run out, and the battery pack should be recharged.
Unlike other battery pack types, Lithium-Ion battery packs deliver fade-free
power for their entire run time. The tool will not experience a slow, gradual
loss of power as you work. To signal that the battery pack is at the end of its
run time and needs to be charged, power to the tool will drop quickly.
NOTE: The LED may also flash due to an overload or high temperature situation
(see BATTERY PROTECTION).
BATTERY PROTECTION
The circuitry protects the battery pack from extreme temperature, over-discharge,
and over-charge. To protect the battery from damage and prolong its life, the
battery pack circuitry will turn off the battery pack if it becomes overloaded or
if the temperature becomes too high during use. This may happen in extremely
high torque, binding, and stalling situations. This intelligent system will shut down
your battery pack if its operating temperature exceeds 176°F (80°C) and will begin
normal operation when it returns to 32°F (0°C) - 122°F (50°C).
The LED light will begin to flash slowly if the battery circuitry detects a
momentary overload.
NOTE: The battery can automatically reset. If the LED continues to flash, that
indicates that the capacity is too low. Place the battery on the charger for
charging (see BATTERY CAPACITY INDICATOR, above).
NOTE: A significantly reduced run time after fully charging the battery pack
indicates that the battery is near the end of its usable life and must be replaced.
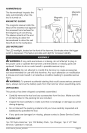
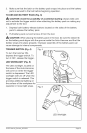
TO ATTACH BATTERY PACK (Fig. 3)
_1_ CAUTION: Avoid the
possibility of accidental
starting: always take care not
to activate the trigger switch
when you are attaching the
battery pack or making any
adjustment to the tool.
1.
Align the raised portion on
the battery pack with the
grooves on the bottom of
the hammer, then attach the
battery pack to the hammer
as shown.
Fig. 3
61352 Manual_Revised_08 0924 Page 13