


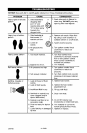

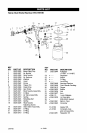
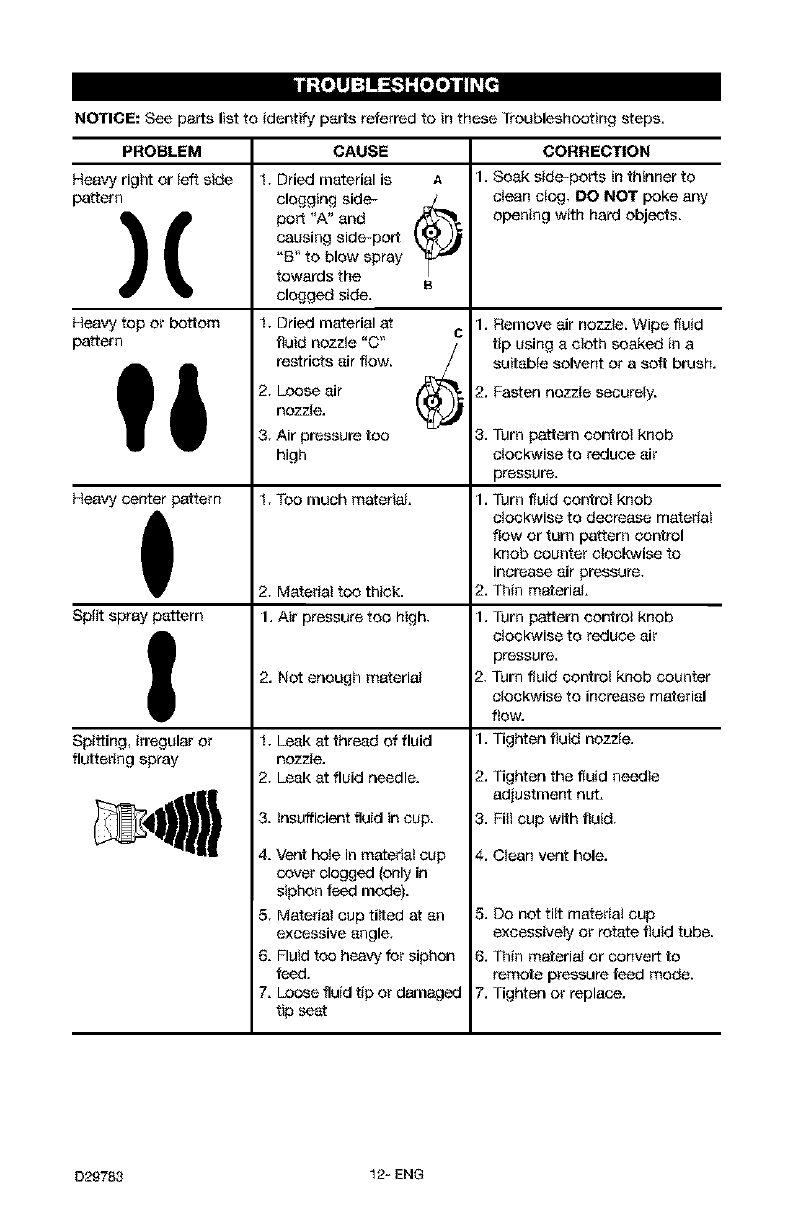
NOTICE: See parts fistto identify parts referred to inthese Troubleshooting steps.
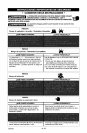
PROBLEM CAUSE CORRECTION
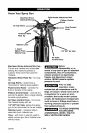
4envy right or left side 1, Dried material is A 1. Soak side-ports in thinner to
3attarn clogging side- j alean alog, DO NOT poke any
• • port "A_ and (_ opening with hard objects.
) t " causing side-port
"B" to blow spray
_ towards the B
clogged side.
4envy top or bottom
3attarn
ii
9envy center pattern
Sptit spray pattern
Spitting, irregular or
luttering spray
1, Dried material at
c
fluid nozzte "C
/
restricts air flow. /
2, Loose air /_--'_
nozzle.
3, Air pressure too
high
1, Too much matarial.
2, Materia} too thick.
1.Air pressure too high,
2. Not enough material
1, Leak atthread of fluid
nozzte.
2, Leak at fluid needle.
3. insufficient fluid in cup.
4. Vent hole in matedal cup
cover clogged (only in
siphon feed [ned@.
5, Mater_a} cup titled at an
excessive angle,
6. Fluid too heavy for siphon
feed.
7. Loose fluid tip or damaged
tip seat
1. Remove air nozzle. Wipe fluid
tip using a cloth soaked in a
suitabte solvent or a soft brush.
2. Fastennozzte secarety.
3. Turn pattern control knob
alockwise to reduce air
pressure.
1.Turn fluid control knob
alockwise to decrease materia}
flow or turn pattern control
knob counter clockwise to
increase air pressure,
2. Thin material.
1.Turn pattern control knob
alockwise to reduce air
pressure.
2, Turn fluid control knob counter
alockwise to increase material
flow.
1.Tighten fluid nozzle.
2. Tighten the fluid needle
adjustment nut.
3. Fii} cup with fluid,
4. Clean vent hole.
S. Do not tilt materia} cup
excassiveiy or rotate fluid tube.
6. Thin material or convert to
remote pressure feed mode.
7. Tighten or replace.
D29783 12-ENG