


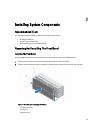
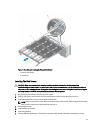
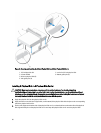


1. Hold the disk drawer and push it into the chassis until it is seated properly.
2. Hold and rotate the release latches toward the system until the release latches lock into place.
3. Install the front bezel.
Removing The Physical-Disk Drawer
CAUTION: Many repairs may only be done by a certified service technician. You should only perform
troubleshooting and simple repairs as authorized in your product documentation, or as directed by the online or
telephone service and support team. Damage due to servicing that is not authorized by Dell is not covered by your
warranty. Read and follow the safety instructions that came with the product.
1. Prepare the physical-disk drawer for removal using the MD Storage Manager software.
For more information, see the
Dell PowerVault MD3260/3260i/3660i/3660f/3060e Storage Arrays Administrator's
Guide
at support.dell.com/manuals.
2. Remove the front bezel.
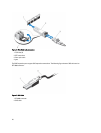
3. Remove both the SAS cable chains from the back of the chassis.
4. Open the disk drawer.
NOTE: Note and save the location of the physical disks before removing the physical disks from the physical-
disk drawer.
NOTE: The physical-disk drawers are not hot-swappable. Replacing a physical-disk drawer causes all of the
physical disks in the replaced drawer to be unavailable to the controllers in the storage subsystem. If the
arrays that physical disks in the to-be-replaced drawer were created without drawer loss protection, you
must schedule down time to replace the drawer because these arrays fail when the drawer is replaced.
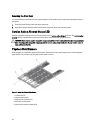
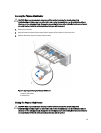
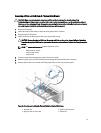
5. Remove all the physical disks from the disk drawer.
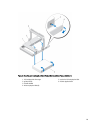
6. Slide the disk drawer out until the release tab on each side of the disk drawer is visible.
7. Pull the release tab toward the front of the system to release the drawer from the chassis and pull the disk drawer
out of the chassis.
26