


1. If possible, use the MD Storage Manager to create, save, and print a new storage array profile.
2. If the Recovery Guru directed you to replace a failed RAID controller module, go to step 3, else run the Recovery
Guru to identify the failed component.
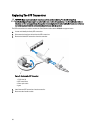
3. Unpack the new SFP transceiver.
NOTE: Ensure that the SFP transceiver is replaced by the same type.
NOTE: Set the new SFP transceiver on a dry, level surface near the RAID controller module, the RAID
controller module enclosure, or the expansion enclosure.
NOTE: Save all the packing materials in case you need to return the SFP transceiver.
4. To locate a failed SFP transceiver, view the FC IN (host channel) speed LEDs on the front of the RAID controller
modules. If an SFP transceiver has failed, both FC IN speed LEDs for a particular port are off.
– If both FC IN speed LEDs are off for a particular port with a known good cable, the SFP transceiver must be
replaced. Go to step 6.
– If at least one FC IN speed LED is on for a particular port, the SFP transceiver is functional. The FC IN speed
LEDs indicate a channel speed of 2 Gbps, 4 Gbps, or 8 Gbps. Ensure that the speed indicated by the LEDs is
what is expected.
Troubleshooting External Connections
• Verify that the cables are connected to the correct ports before troubleshooting any external devices. For the
location of the back-panel connectors on your storage array, see Back-Panel Features And Indicators.
• Ensure that all the cables are securely attached to the external connectors on your array.
• For information on cabling, see the Deployment Guide for your storage array at support.dell.com/manuals.
Troubleshooting Power Supply Modules
CAUTION: Many repairs may only be done by a certified service technician. You should only perform
troubleshooting and simple repairs as authorized in your product documentation, or as directed by the online or
telephone service and support team. Damage due to servicing that is not authorized by Dell is not covered by your
warranty. Read and follow the safety instructions that came with the product.
CAUTION: It is recommended that you turn off the host server before turning off the array to prevent loss of data.
1. Locate the faulty power supply and determine the status of the LEDs.
– If the AC power LED is not lit, check the power cord and power source into which the power supply module
is plugged.
* Connect another device to the power source to verify if it is working.
* Connect the cable to a different power source.
* Replace the power cable. If the problem is not resolved, see Getting Help.
– If the DC power LED is not lit, verify that the power switch is turned on. If the power switch is turned on, see
step 2.
– If the power supply module’s fault indicator is lit, see Getting Help.
CAUTION: Power supply modules are hot-swappable. The array can operate on a single power supply
module; however both modules must be installed to ensure proper cooling. A single power supply module can
be removed from a powered-on array for a maximum period of five minutes. Beyond that time, the array may
automatically shut down to prevent damage.
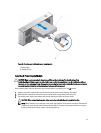
2. Reseat the power supply module by removing and reinstalling it.
46