


Installing The RAID Controller Module Backup Battery Unit
You must replace the RAID controller battery backup unit immediately to ensure the security of the data in the controller
cache memory.
CAUTION: Many repairs may only be done by a certified service technician. You should only perform
troubleshooting and simple repairs as authorized in your product documentation, or as directed by the online or
telephone service and support team. Damage due to servicing that is not authorized by Dell is not covered by your
warranty. Read and follow the safety instructions that came with the product.
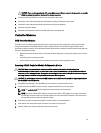
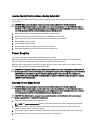
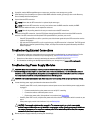
1. Align the backup battery unit with the slots on the RAID controller module.
2. Slide the backup battery unit toward the connector on the RAID controller module.
3. Tighten the screw that secures the backup battery unit to the RAID controller module.
4. Close the RAID controller module.
5. Install the RAID controller module.
6. Connect all the cables to the RAID controller and the storage array.
7. Use MD Storage Manager to check the status of all the storage arrays.
Power Supplies
Your system supports two hot-swappable 1755 W power supply modules.
When two identical power supplies are installed, the power supply configuration is redundant. In redundant mode,
power is supplied to the system equally from both power supplies to maximize efficiency.
When one power supply module is removed or has failed, the power supply configuration is non-redundant. Power is
supplied to the system only by the single power supply module.
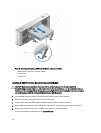
CAUTION: Do not plug the enclosure into a standard power outlet. Your storage array is shipped with two IEC C19
to C20 jumper cables. Connect the C19 plug to the array’s power supplies and the C20 plug to the power distribution
unit (PDU) in the rack cabinet. For power redundancy, split the power connections from each enclosure into
separate PDUs and connect the PDUs to external power receptacles on different circuits. The enclosure supports
only 200 V to 240 V input sources.
Removing A Power Supply Module
CAUTION: Many repairs may only be done by a certified service technician. You should only perform
troubleshooting and simple repairs as authorized in your product documentation, or as directed by the online or
telephone service and support team. Damage due to servicing that is not authorized by Dell is not covered by your
warranty. Read and follow the safety instructions that came with the product.
CAUTION: The system requires one power supply module for normal operation. Remove and replace only one
power supply at a time in a system that is powered on.
1. Identify and locate the faulty power supply module.
NOTE: The service action required indicator lights amber when there is a fault in the power supply module.
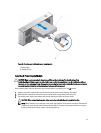
2. Disconnect the power cable from the power source and the power supply module you intend to remove and
remove the cables from the cable securing strap.
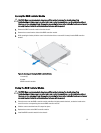
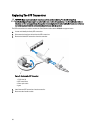
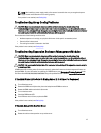
3. Pull and rotate the two release levers away from the chassis until the power supply module is free from the slot.
4. Hold the power supply module and slide the power supply out of the chassis.
40