


10
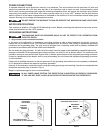
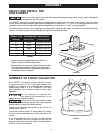
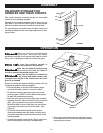
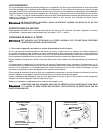
ON-BOARD STORAGE FOR
SPINDLES AND TABLE INSERTS
This sander features on-board storage for three table
inserts and four sanding spindles.
Storage for the sanding spindles can be found on the
right side of the machine (See Figure 8) while storage
slots for the table inserts are located on the left side.
For convenience and safety, keep all table inserts and
sanding spindles that are not being used stored in their
proper areas.
ASSEMBLY
OPERATION
FIGURE 8
Failure to read and understand the
instructions, warnings and safety
guidelines provided in this manual may lead to serious
injury and / or damage to machine or the work piece.
Be sure the sanding spindle is
securely installed in the machine.
Make sure the table tilt locking levers
are secured and that the table is
locked in place at the desired angle or tilt.
Make sure the machine is installed on
a flat, sturdy and stable surface able
to support the weight of the machine and the work
piece to be sanded.
Select and install the desired sanding spindle with the
corresponding table insert (see page 9).
•Ensure the table is at the correct sanding angle
and that the table position is locked in place.
• To start the machine, remove the lock-out pin and
push the green “START" button. Wait for the spindle
to reach full speed before sanding.
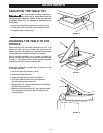
•Hold the work piece firmly and work from a stable
standing position. When the table is fully horizontal
(90°), you may sand from any part of the table.
When the table is tilted, make sure the work piece
is positioned on the front half of the table. (See
Figure 9.)
• To achieve the best finish results and to ensure
maximum sanding sleeve life, slowly move the work
piece back and forth across the entire surface of the
sanding spindle
• To stop the machine, push the red “Stop" button and
wait for the spindle to come to a complete stop.
FIGURE 9
• When you have finished using the machine be sure
to re-install the lock-out pin and unplug the machine
from the power source.