


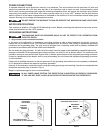


9
Failure to use the proper insert with the corresponding spindle may result in injury and/or damage to
the machine or the work piece.
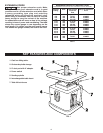
Your DELTA
®
Heavy Duty Oscillating Bench Spindle Sander comes with four table insert plates. The two table
inserts with the smaller diameter openings are designed for use with the ¼", ½", and
5
/8" sanding spindles while the
two table inserts with the larger openings are designed for use with the 1 ½’ and 2" sanding spindles.
The table inserts with the round openings are designed for sanding jobs where the table is in the fully horizontal
position. The table inserts with the oblong openings are for beveled sanding.
FIGURE 5
ASSEMBLY
SELECT AND INSTALL THE
TABLE INSERT
SPINDLE SIZE
(diameter)
RECOMMENDED TABLE INSERT
Opening Size Opening Shape
¼" Small Oblong or Round
½" Small Oblong or Round
5
/8" Small Oblong or Round
1 ½" Large Oblong or Round
2" Large Oblong or Round
FIGURE 6
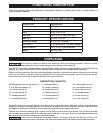
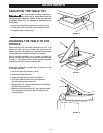
•Using the recommended table inserts shown in
Figure 5, select the desired table insert.
• Slip the table insert over the spindle. Ensure the table
insert is properly seated by aligning the small notch
in the table insert with the corresponding small tab in
the table as shown in Figure 6.
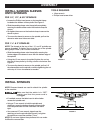
CONNECT TO A DUST COLLECTOR
Your DELTA
®
Oscillating Bench Spindle Sander
is equipped with a 2" to 4" dust port adaptor that
enables you to attach it to a standard dust collection
system using either a 2" or 4" connection. This must
be connected to dust collector hoses to ensure safe
operation.
Do not attempt to operate this
tool without first connecting it to an
adequate dust collection system.
Always turn on the dust collector before
starting the sander and always stop the
sander before turning off the dust collector.
Locate the 2" diameter dust outlet on the rear of the
machine (see Figure 7).
If your dust collector uses a 2" hose, attach it by fitting
the hose over the existing dust port on the back of the
sander.
If your dust collector has a 4" hose, fit the supplied
2" to 4" adaptor over the existing dust port on the
machine, then attach the hose from your dust collector
to the 4" outlet on the adaptor.
FIGURE 7