


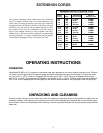

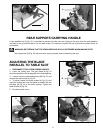

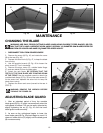


2. Remove the screw (A) Fig. 45, and rotate the cover
(B) to the rear (Fig. 46).
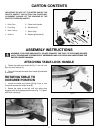
3. Depress the arbor lock (A) Fig. 47, to keep the blade
from turning.
4. Use the supplied wrench (D) Fig. 48 to loosen the
arbor screw (E). Turn it clockwise.
5. Remove the arbor screw (E), outside blade flange
(F), and saw blade (G) from the saw arbor.
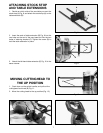
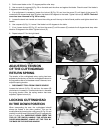
6. Attach the new blade. BE CERTAIN THAT THE
TEETH OF THE SAW BLADE ARE POINTING DOWN
AT THE FRONT. Use the supplied wrench to attach the
outside blade flange (F) Fig. 48, and the arbor screw (E).
At the same time, depress the arbor lock to keep the
blade from turning.
7. Replace the screw and cover (moved to the rear in
STEP 2).
WARNING: REMOVE THE WRENCH BEFORE
TURNING THE POWER ON.
16
Fig. 43 Fig. 44
C
A
D
B
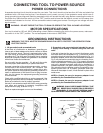
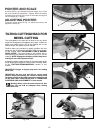
MAINTENANCE
CHANGING THE BLADE
WARNING: USE ONLY CROSS-CUTTING BLADES. WHEN USING CARBIDE TIPPED BLADES, BE CER-
TAIN THAT THEY HAVE A NEGATIVE HOOK ANGLE. USE ONLY 10
″″
DIAMETER SAW BLADES RATED FOR
6000 RPM OR HIGHER AND HAVE 5/8
″″
DIAMETER ARBOR HOLES.
1. DISCONNECT TOOL FROM POWER SOURCE.
Fig. 45
Fig. 46
B
A
B
ADJUSTING BLADE GUARD
1. After an extended period of time, the movable
blade guard (B) Fig. 45 might move erratically when the
cuttinghead is lowered. This can be easily corrected by
slightly tightening the nut (C) Fig. 45 until the lower
blade guard moves smoothly.
2. As soon as the cuttinghead begins to lower, the
lower blade guard (B) Fig. 45 should begin to move. If it
does not, loosen the nut (C) slightly until the blade guard
(B) moves smoothly.
C