


To reduce the risk of serious personal injury, turn tool off and disconnect tool from power source before
installing and removing accessories, before adjusting or changing set-ups or when making repairs. An
accidental start-up can cause injury.
Stay alert. The stand may tip during this procedure.
6
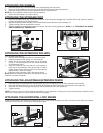
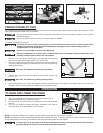
PRODUCT STABILITY TEST
The Universal Miter Saw/Planer stand is designed to be used in conjunction with a wide variety of miter saws, compound miter
saws, sliding compound miter saws, and planers.
Any tool used with this stand must be properly positioned and secured to ensure stability and to prevent
inadvertent tipping.
To confirm the stability of your unit:
Use two or more people to perform the stability test.
Raise the cuttinghead for all miter saws, compound miter saws, and sliding compound miter saws. Lock
all sliding compound miter saws in the rear position.
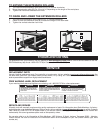
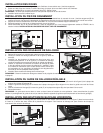
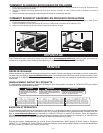
1. Place a 2-1/2" thick block of wood (A) Fig. 15 under the front leg (B) of
the stand so that the front leg is raised 2-1/2" off the floor.
2. With one person in front of the stand, and the other person behind, lift
the front of the stand slightly, remove the block of wood, and allow the
stand to fall forward.
3. Perform this same test with the block of wood under the rear leg
(C) Fig. 15.
4. If the stand tends to tip to the front, reposition the tool toward the rear of the stand. If the stand tends to tip to the rear,
reposition the tool forward. Make your adjustment, then repeat the test.
OPERATION
Fig. 15
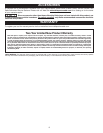
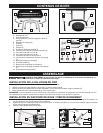
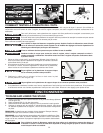
TO RAISE AND LOWER THE STAND
1. Place your right foot on the bottom of the extension leg (A) Fig. 16.
2. Grasp the handle (B) Fig. 16 with both hands.
3. Use the thumb of your left hand to push down on the red activating
lever (C).
4. Lift up on the handle to release the safety mechanism, then raise or
lower the stand. It will automatically lock into place.
NOTE: The stand will adjust to two heights. Try both, select the one that fits you, and lock it in place.
NOTE: The stand has a gas-controlled cylinder that aids in raising the stand. To put the stand in the "down" position, push down
on the red activating lever, lift up on the handle, then exert downward pressure on the handle.
To reduce the risk of injury, keep both hands on handle when raising and lowering the stand. The stand has
gas assist lifting and may raise unexpectedly when lever is released.
Stay alert. The stand may tip during this procedure.
Fig. 16
A
B
C
A
B
C
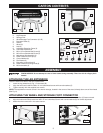
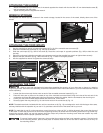
Fig. 12
Fig. 13
A
A
Fig. 14
Mount your planer as shown in Fig. 14 to assure maximum stability.