


16
ASSEMBLY
(continued)
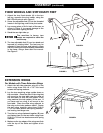
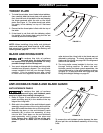
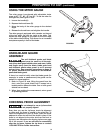
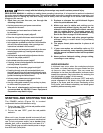
BLADE GUARD
To reduce the risk of serious personal
injury, the blade guard must be in
place when making a through cut.
1. While holding the blade guard assembly (A) in a
vertical position, hook the locating pin (B) at the
back end of the blade guard assembly into the slot
at the back edge of the riving knife.
2. Rotate the blade guard assembly toward the front
of the saw until the metal portion (C) of the blade
guard assembly is parallel to the table as shown in
Figure 13.
3. While holding down on the front of the metal
portion of the guard (C) press the blade guard
lock lever (D) down until it snaps into the locked
position. Check to make sure the guard is locked
onto the riving knife by pulling on the guard. If the
guard is not locked, the blade guard lock lever will
flip up to the unlocked position.
If the metal portion of the blade guard
assembly (C) is not parallel to the
table, the riving knife is not in the raised position.
Remove blade guard assembly and anti-kickback
pawls and raise riving knife, then reinstall the anti-
kickback pawls and the blade guard assembly.
A
B
D
C
FIGURE 13
To remove the blade guard assembly:
1. Lift the blade guard assembly lock lever (D) to the
unlocked position.
2. Rotate the guard back and slide the pin (B) from the
riving knife slot.
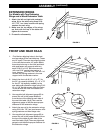
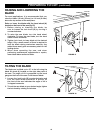
RIP FENCE
Attach the handle to the fence cam
The rip fence slides onto the rear fence rail so that the
hook is under the rear rail and rides on the front guide
tube. The fence locks in place by applying pressure in
a downward motion on the rip fence handle. Rip fence
alignment should be checked prior to using your saw.
To check alignment of the rip fence, see alignment
instructions on page 29.
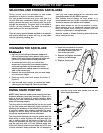
MITER GAUGE
Insert miter gauge into each miter slot to make sure it
slides freely. See Adjusting the Miter Stops section on
page 28 for adjustment of miter gauge accuracy.
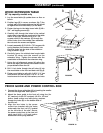
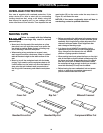
ON-BOARD STORAGE
The Delta #36-5000 series contractor table saw
comes with on-board storage for the provided miter
gauge, arbor wrench, push stick and fence. There
is also on-board storage for spare saw blades (sold
separately). The miter gauge, spare blade and arbor
wrench storage areas are located on the right side
panel of the machine and come pre-installed.
On-board storage for the fence and the push stick is
located on the left side of the saw.