


English
3
Electrical Connection
Be sure your power supply agrees with the nameplate marking. 120 volts,
AC/DC means that your saw will operate on alternating or direct current. A
voltage decrease of 10 percent or more will cause a loss of power and
overheating. All D
EWALT tools are factory tested. If this tool does not operate,
check the power supply.
Unpacking Your Saw
Check the contents of your miter saw carton to make sure that you have
received all parts. In addition to this instruction manual, the carton should
contain:
1. One No. DW705 miter saw.
2. One D
EWALT 12" dia. saw blade
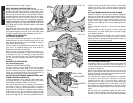
3. One blade wrench in wrench pocket shown in Fig. 2.
4. One DW7053 Dustbag (Some models)
5. One Side Table Extension (Some Models)
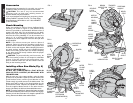
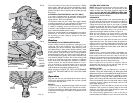
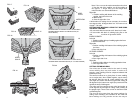
Familiarization
Your miter saw is fully assembled in the carton. Open the box and lift the saw
out by the convenient carrying handle, as shown in Figure 1.
Place the saw on a smooth, flat surface such as a workbench or strong table.
Examine Figures 2 & 3 to become familiar with the saw and its various parts.
The following section on adjustments will refer to these terms and you must
know what and where the parts are.
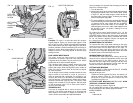
Press down lightly on the operating handle and pull out the lock down pin, as
shown in Figure 4. Gently release the downward pressure and allow the arm to
rise to its full height. Use the lock down pin when carrying the saw from one
place to another. Always use the carrying handle to transport the saw or the
hand indentations shown in Fig. 3.
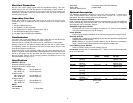
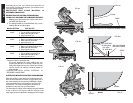
Specifications
CAPACITY OF CUT
48 degree miter left and right
48 degree bevel left: 3 degree right
0 degree miter
Max. Height 3.9" Result Width 5.9"
Max. Width 7.9" Result Height 2.5"
45 degree miter
Max. Height 3.9" Result Width 4.1"
Max. Width 5.5" Result Height 2.5"
45 degree bevel
Max. Height 2.7" Result Width 5.9"
Max. Width 7.9" Result Height 1.7"
DRIVE
120 Volt Motor
2200 Watts 15 Amp Motor
4000 RPM Cut Helical Gears with Roller Bearings
Multi-V Belt Carbide Blade
Automatic Electric Brake
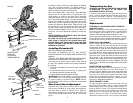
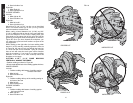
Optional Accessories
The following accessories, designed for your saw, may be helpful. In some cases,
other locally obtained work supports, length stops, clamps, etc., may be more
appropriate. Use care in selecting and using accessories.
Extension, Work Support: DW7050
Used to support long overhanging workpieces, the work support is user assembled and
stores conveniently under the saw table. Your saw table is designed to accept two
work supports; one on each side. (Page 5)
Adjustable Length Stop: DW7051
Requires the use of one work support (see above). It is used to make repetitive
cuts of the same length from 0 to 42".(Page 5)
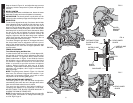
Clamp: DW7052
Used for firmly clamping workpiece to the saw fence for precision cutting (Page 6)
Dust Bag: DW7053
Equipped with a zipper for easy emptying, the dust bag will capture the majority of the
sawdust produced. (Not shown))
NOTE: Deflector on dust spout channels debris to ground. Spout has a provision to
attach a vacuum hose to collect sawdust. Lift dust spout to connect hose.
Crown Molding Fence: DW7054
Used for precision cutting of crown molding.(Page 6)
SAW BLADES: ALWAYS USE 12" SAW BLADES WITH 1" ARBOR HOLES. SPEED RATING MUST
BE AT LEAST 4800 RPM.
CAT APPLICATION BLADE NO. OF TYPE
NO. DESC. TEETH OF CUT
DW3128 Fine Trim Thin Kerf 80 Smooth,
Molding Splinter Free
DW3228 Fine Trim Thick Kerf 80 Very Smooth,
Molding Splinter Free
DW7296 Fine Trim Thick Kerf 96 Ultra Smooth
Molding Splinter Free
DW3123 Framing, Thin Kerf 32 Fast Cut
Decking
DW3224 Framing, Thick Kerf 48 All around cutting
Decking
DW3226 Trim, Framing Thick Kerf 60 Smooth Cross Cuts
Decking
DW3229 Non-Ferrous Thick Kerf 80 Straight, burr free
Metals special tooth
grind