9
ENGLISH
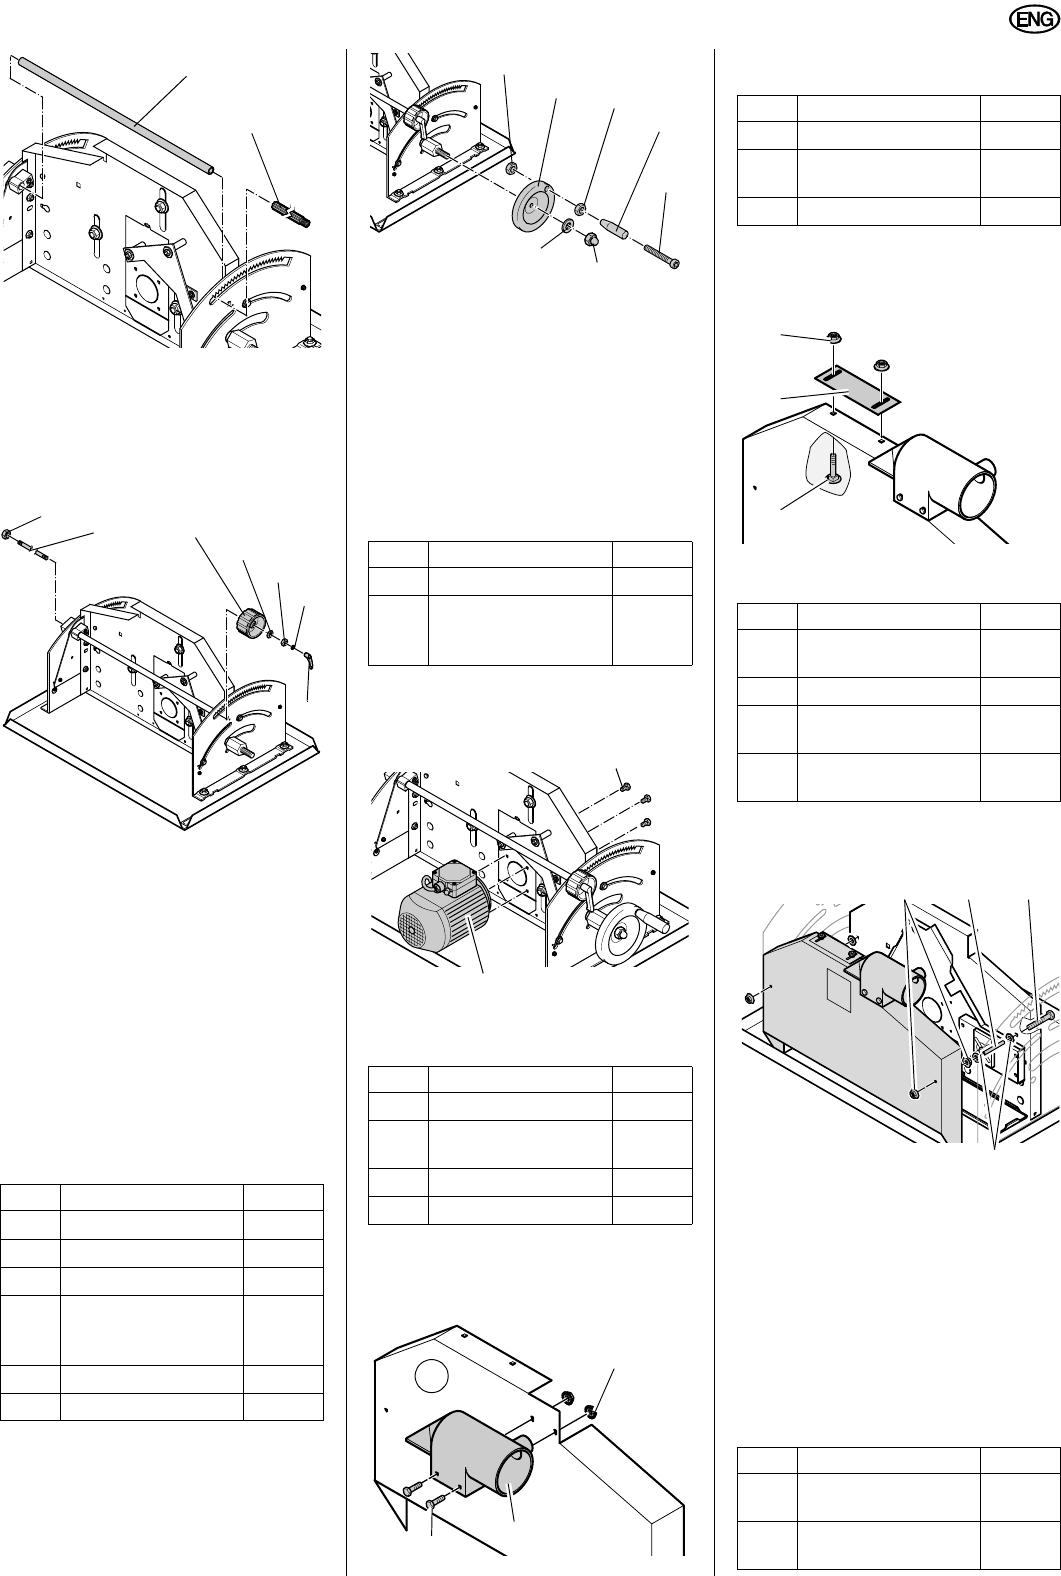
4. Slide pinion shaft (78) from the front
into the setting tube, so that it will
rest on the gears of the front and
rear chipcase guide panels (the
threaded end of the pinion shaft
must be at the front of the saw).
5. Put setting knob (80) on the pinion
shaft and secure in place with
washer (81) and hexagon thin nut
(82).
6. Turn the prevailing torque-type hex-
agon nut (76) on the threaded rod
(79), so that approx. 2 thread will
protrude.
7. Slide the threaded rod into the pin-
ion shaft from the rear of the saw.
8. At the front, put a washer (83) and a
lock lever (84) on the threaded rod
and tighten.
Handwheel installation
1. Put the turning tang (81) on the cap
screw (82), then screw on a hexa-
gon nut (79) so far down that the
turning tang will still easily turn.
2. Fasten the thus prepared turning
tang with the second hexagon nut
(79) to the handwheel (80) and
tighten both hexagon nuts.
3. Put handwheel on the threaded
spindle of the motor carrier unit and
secure with washer (84) and cap nut
(83) – to counter, hold the hexagon
nut on the spindle.
Motor installation
• Fasten motor (86) with hexagon
head screws (85) to the motor car-
rier unit.
Installation of dust extraction port to
the chipcase
− Attach the suction port (87) with two
hexagon head screws (88) and
flange nuts (89) as illustrated to the
outside of the chipcase (90).
Installation of sliding plate port to the
chipcase
• Install the sliding plate (91) on the
outside of the chipcase, using two
each saucer-head screws (92) and
flange nuts (93).
Installation of chipcase to the motor
carrier unit
1. Insert one each hexagon head
screw (94) from the motor side into
the motor carrier unit.
2. From the saw blade side, put one
each washer (95), distance sleeve
(96) and another washer (95) on the
hexagon head screw, then secure
with one each prevailing torque type
hexagon nut (97).
3. Slide the pre-assembled chipcase
onto the two hexagon head screws
and fasten with one each prevailing
torque type hexagon nut (97).
Cover installation
Item Description Qty.
79
Hexagon nut M6
2
80
Handwheel
1
81
Turning tang
1
82
Hex. socket counter-
sunk head screw
M6 x 60
1
83
Cap nut M14
1
84
Washer 15/28
1
77
78
76
81
82
83
80
79
84
Item Description Qty.
86
Motor
1
85
Hexagon head
screw, prevailing
torque type, M6 x 16
4
Item Description Qty.
87
Dust extraction port
1
88
Hexagon head screw
M5 x 16
2
89
Flange nut M5
2
90
Chipcase
1
79
80
79
81
82
83
84
85
86
87
88
90
89
Item Description Qty.
91
Sliding plate
1
92
Cup square neck
screw M5 x 16
2
93
Flange nut M5
2
Item Description Qty.
94
Hexagon head screw
M6 x 80
2
95
Washer 6.4/12.5
4
96
Distance sleeve 6 x
60
2
97
Hexagon nut, prevail-
ing torque type, M6
4
Item Description Qty.
98
Hexagon nut, prevail-
ing torque type, M6
2
99 Distance sleeve
6.4 x 1515
2
93
91
92
97 94
95
96


